Search This Blog

Showing posts with label George and Basic Shapes. Show all posts

Thursday, September 15, 2011

#111 Rock Princess - Party Invitation

Hi everyone! For the last Cricut Circle Weekly Challenge we were asked to use the following sketch to create a card and add glitter to our projects:

I decided to follow this sketch to make an invitation for my daughter's 8th birthday party coming up in a few weeks. She has decided on a Monster High theme and I thought the skull from Rock Princess matched that theme well. Here is my take on the sketch:


The skull (cut at 2.25") and the word "party" (cut from a phrase at 3") were from the Rock Princess cartridge. The circles (1.75") were from George and Basic Shapes


I added glitter, by Martha Stewart Crafts, to the skull, the word "party", and to the circles.


For the background, I used a Cuttlebug folder from the Once Upon a Princess companion set with some Black Magic Core-dinations cardstock. I sanded over the raised image to bring out the pink core of the cardstock for the flowers.


Hope you like it!

Tuesday, June 28, 2011

#90 Makin' the Grade - Travel BINGO!

Hi everyone! Here is fun project that I just finished up for the Cricut Circle Blog monthly challenge. The theme this month was "On the Road Again" and the task was to create a project to be used during a road trip. The first thing I thought of was BINGO because my siblings and I used to create BINGO cards for traveling then swap them for a game. Ours were a lot more difficult than these though! No one wanted anyone else to win - I remember UFO and kangaroo being on someone's card LOL. I created these books with two of my children in mind - my daughter is almost 8 and my son is 4, so his a little bit easier :-).


To create the books, rather than using up my white cardstock (I need that for my Imagine :-)), I used patterned paper from my stash that I didn't really care for. You know those huge paper stacks you bought when you first started scrapping that always had stuff in them that you were never gonna use? Anyway, I cut each piece at 6"X12" and glued them patterned sides together to make the pages. Each page was folded in half, they are all stacked together. I then used my Crop-a-dile Big Bite to punch the holes for the binding. So simple!


For the cover I used the Makin' the Grade cartridge for the font and shadow, cut at 1.5", and welded the words together on my Gypsy.


The car is from the Beep Beep Lite cartridge and is cut at 1.75".


The stars (1.25" and 0.75") and hearts (1.5" and 1") are from George and Basic Shapes.

For the inside pages I used Designer's Calendar to create the grid, I just cut off the excess because the one on the cartridge, being meant for a calendar, had too many squares. The grid was cut at 5".

"BINGO" was also from Makin' the Grade and was cut at 0.75".


And I think that's it! Hope you like it! If you have any questions, feel free to ask!


Saturday, June 18, 2011

#89 Billionaire - Happy Father's Day!

Hi everyone! Yesterday I created for the weekly challenge on the Cricut Circle Blog. The task this week was to create a Father's Day card using this sketch:


Here is my creation:


For my card I used the Billionaire Lite cartridge along with the JT Imagine cartridge for the patterns and colours on the card.


Background - cut at 5.3"


Tie - cut at 2.5"


"Dad" - cut at 1.3"


Circle (from George and Basic Shapes) - cut at 3".


The sentiment is from the My Creative Time stamp set "You're my Best Buddy"


Hope you like it!


P.S. I will have my 500 follower giveaway ready on Monday so be sure to come back to enter!

Saturday, June 4, 2011

#85 Dinosaur Tracks - Dinosaur Hunt Mini Album

Hi everyone! Today I have for you a dinosaur mini album I have been working on for my son. There is a new dinosaur park near where I live called Jurassic Forest and I can't wait to check it out with my family! I made this mini for all the pictures I take there of my son! Yep that's right, I make projects ahead of time for photos, yet am sooooo far behind on scrapbooking photos I have already taken LOL.

I created this for one of the Cricut Circle Magazine challenges this month. The challenge is to create a project using the Cricut machine and products by one of their sponsors, Imaginisce. This was quite easy for me since I LOVE this company and had a few of their lines in my stash to choose from. The paper collection I chose to use is called Dino-Roar. For my book, I used mainly the Dinosaur Tracks cartridge. The book shape is made from one of the fossil shapes cut at 4.5". All of the bases for the pages were cut from cereal boxes that I have been saving - they sure come in handy on projects to use in the place of chipboard! I find them super easy to cut with the Cricut too! (Blade Depth 6, Pressure 5, Multi-cut 2 with regular blade)
The footprints are from a fossil cut as well, cut at 4.5".
The T-Rex was cut at 3", first from cereal box, then cardstock layers to give it some extra sturdiness. He is attached to the cover with foam squares.
On the front cover, the Imaginisce products used are:
Dino-Roar patterned paper
Dino-Roar Adhesive Strip Borders
Dinosaur Ribbons
Dino-Roar Denim Stickers
Dino-Roar Rub-ons


For my next pages, I made pockets from patterned paper. The tags are circles cut from George and Basic Shapes at 3" (inner circle is 2.5"). I added a cardstock tab and some green Fab Brads by Imaginisce. On the back I added some dinosaur fossils from the Dinosaur Tracks cartridge, all sized differently to fit in the 3" circle.


On these pages I added a photo mat and some of the Denim Stickers.


On these pages I added a photo mat to the left page. The dinosaur, from Dinosaur Tracks, is cut at 2" and adhered to the page with foam squares.


The tag is cut from Fabulous Finds at 2". To the tag I added some of the dinosaur ribbon and a rub-on saying (both from the Dino-Roar collection).


The journalling stamp is also by Imaginisce.


The tags on these pages were cut from Picturesque at 3". I added dinosaur ribbon, decorative staples, buttons, Dino-Roar rub-ons, and Dino-Roar denim stickers. The green pattern on the front of the tag is actually cut from the packaging of the Denim stickers. The strip to hold the tag in is one of the Dino-Roar adhesive strip borders with the backing left on.


The dinosaur on these pages, also from Dinosaur Tracks, is cut at 2.5" and adhered to the page with foam squares.


I used the journalling stamp again as well as the "Stomp Stomp" Dino-Roar rub-on.


The photo mat on the opposite page is cut from Once Upon a Princess at 3.25". On these pages I also used adhesive strip borders, some buttons from my stash and paper yarn from my stash.


On the back, I made a border from on the the patterned papers, as well as an accordian folded strip for photos. The dinosaur, from Dinosaur Tracks, is cut at 2.5" and adhered with foam squares. I also added some of the Dino-Roar rub-ons to each side. Before attaching the photo folder, I put some of the dinosaur ribbon around it and tied it shut.


Well, I think that's it! Hope you like it! If you have any questions about my album, feel free to contact me and I will do my best to help you out! Thanks for stopping by!

Thursday, April 28, 2011

#71 Hello Kitty Font - Go Fly A Kite

Hi everyone! Here is a layout I created for the Cricut Circle Monthly Challenge. In honour of Earth Day, which was last week, the challenge was to create a project while repurposing at least 3 items found in the household.


In my mind, I went through a bunch of different ideas. Should I create a mini album with cereal boxes? A pencil jar from a tin can? A receipt holder from junk mail envelopes? I finally decided that I needed to use my time to work on more scrapbook pages so here is what I came up with.


This is a layout of my daughter flying a kite for the first time on her grandparents' farm.
For my repurposed items I chose:
A cereal box to use as chipboard to cut the base for Hello Kitty and her kite.

String from my kitchen junk drawer for the kite.

Easter basket grass for the bows on the kite string.


Cricut cartridge packaging for the flower accents. I used glossy accents to adhere the plastic to patterned paper cut with the identical shape.


The cricut cartridges/cuts I used are:

Hello Kitty Font - "Go Fly a Kite" (cut at 1.5"), Hello Kitty (cut at 3"), flowers (cut at 1.75")

Boys Will Be Boys - Kite (cut at 3.5")

Storybook - Journalling frame (cut at 4")

George and Basic Shapes - Journalling spot (sized on my Gypsy at 2.75" high and 2.5" wide)

Hope you like it!

Tuesday, April 19, 2011

#68 George and Basic Shapes - Egg Hunt Imagine Layout


Hi everyone! I've been busy scrapbooking today! My little guy was finally cooperating more and letting Mommy do some layouts! Here is a layout I made using my Imagine More Cards cartridge along with the George and Basic Shapes and Easter 2010 Cricut cartridges.

The font is from George and Basic Shapes, cut at 1.5".
The bunny, eggs, grass and basket are all from Easter 2010.


I created this layout with two challenges in mind:


Fantabulous Cricut - create a project with a bunny or chick


Creative Critterz Imaginations - Easter themed Imagine project


Hope you like it!

Monday, February 7, 2011

#33 Indie Art - SWAK and Blog hop WINNER!!

Hi everyone! Hope you had a great weekend and are enjoying your Monday so far... I have a winner from the Think Spring Blog Hop! I used Random.Org to choose the winner of the Hello Kitty Greetings cartridge and that person is lucky #14-


Jamie - Congrats Jamie! I will contact you shortly to get your mailing info!


Pssssttt -- Everyone I just noticed Jamie also has a cartridge giveaway going on at her blog - just click on her name to take you to it!


Now onto my project for the Flaunt it Fridays challenge:


The challenge this week was to use the lips from the Indie Art cartridge. This cartridge was one of the free downloads for the Gypsy and this is the first time I have used it.

"SWAK" is cut from the George and Basic Shapes cartridge.

I used some shiny pink fabric paint for the lighter pink colour then went over the darker pink with Glossy Accents.

All paper is by Anna Griffin (LOVE the flocked Zebra Print!)

The border punch is by EK Success.

Hope you like it!

Saturday, February 5, 2011

Think Spring Blog Hop - #31 Old West

Hi everyone! Welcome to the Think Spring Blog Hop! You should have arrived here from The Crafty Creation Spot. If not, please go to Creations With Kathryn to start from the beginning. You don't want to miss anything!

I have two projects to show you today - one card and one layout!
My card is a pop-up card. This is what it looks like when it is folded. I fits into a standard A2 size envelope.

Here is what it looks like when it is set up - the base just slides down and VOILA!

The flower and butterfly stamps are by CTMH from the stamp set "Love in Bloom".

The sentiment is by My Pink Stamper from "Fruit and Veggie Puns".

I coloured in the images with my Copic markers.

My card was created from a video tutorial by Dawn on YouTube. If you would like to watch this tutorial click HERE. She has a ton of great other videos too!

For my second project, I created a layout using my Imagine machine. Growing up on a cattle farm, one of my favorite things about spring is the baby calves being born! They are soooooo cute! I had some pictures still unscrapped from when my daughter was 18 months old and having her first interaction with the babies on Grandma and Grandpa's farm. I know it looks like winter in these pictures but it was actually April - really... LOL

I used the Blossom Imagine Pattern cartridge in combination with the following regular Cricut cartridges:
Old West - Title letters and hay bale
Create a Critter - Calf
Sugar and Spice - Scalloped border
George and Basic Shapes - Large shape behind title

Hope you like my projects!

Now, I have a prize to give away to a lucky commenter! All you have to do is leave a comment on this post and I would love it if you would also follow my blog! You can win this Hello Kitty Greetings cartridge! I will use Random.Org to choose a winner on Monday. Good luck!


Hope you are enjoying the blog hop! Next you should head over to Scrappy Craft Corner - that's your next stop on the hop! Here is a list of the bloggers in order in case you get sidetracked along the way!
1) Wamfamily - Creations with Kathryn http://wamfamily.blogspot.com/
2) Scrappin' Palace - Scrappin' Palace http://scrappinpalace.blogspot.com/
3) Ms Dee - Dee's Special Things http://dees-specialthings.blogspot.com/
4) Buggin Out - Paper Crafting Chic http://papercraftingchic.com/
5) lechristina3 - All Things Crafty http://allthingscrafty3.blogspot.com/
6) TinaB - Tina Time http://ollieanddextersmommy.blogspot.com/
7) Lissa - So Many Crafts, So Little Time http://www.somanycrafts.wordpress.com/
8) Crafty Baskets - Crafty Baskets http://craftybaskets.blogspot.com/
9) Java Jen - Java Jen Creations http://javajencreations.blogspot.com/
10) Stephanie J - Stephanie's Scraping/Stamping/Cardmaking Site http://stephaniejohnsonscraps.blogspot.com/
11) CraftyCreations - The Crafty Creation Spot http://thecraftycreationspot.blogspot.com/
12) Jennifer Hawkins2 - Confessions of a Scrapaholic
http://scrapaholicjen.blogspot.com/ - you are HERE!
13) Laura Mason - Scrappy Craft Corner http://scrappycraftcorner.blogspot.com/
14) Scrappy Jess - Scrappy Jess http://scrappyjess.blogspot.com/
15) TX Scrapper Mom - TX Scrapper Mom
http://txscrappermom.blogspot.com/
16) Kreimers - My Fantabulous Life http://fantabulouslypink.blogspot.com/
17) SoonerMT - Paper Renee http://www.paperrenee.com/
18) ToniBaczek - Happy Scrapper http://happyscrapper-baczek.blogspot.com/
19) Croppin Momma - Croppin Momma Designs http://croppinmommadesigns.blogspot.com/
20) Sarahbeth - Scrapbooking with Sarah http://scrapbookingwithsarah.blogspot.com/
21) Nicolette Simpson - Beyond Scrapin http://beyondscrapin.blogspot.com/

Have a great weekend everyone - thanks for joining us on our Think Spring Blog Hop!

Wednesday, January 26, 2011

#19 Cindy Loo - Gift Card Holder


Hi everyone! Here is a gift card holder I created for the Wacky Wednesday challenge at More than Favors, which is over in 20 minutes. I finished in time though!

The cartridges I used for this card are:

Cindy Loo - gift card (cut at 8"), deer couple (cut at 2 3/4"), heart border (cut at 3/4")

George & Basic Shapes - pink hearts (cut at 3/4")


Patterned paper - K & Company

Cardstock - Stampin' Up, CTMH

"You're a Deer" stamp - My Pink Stamper

Ink - Stampin' Up (Rose Red), CTMH (Chocolate)


Hope you like it! Thanks for stopping by!

Saturday, January 8, 2011

Imagination Monday Challenge - Chinese New Year


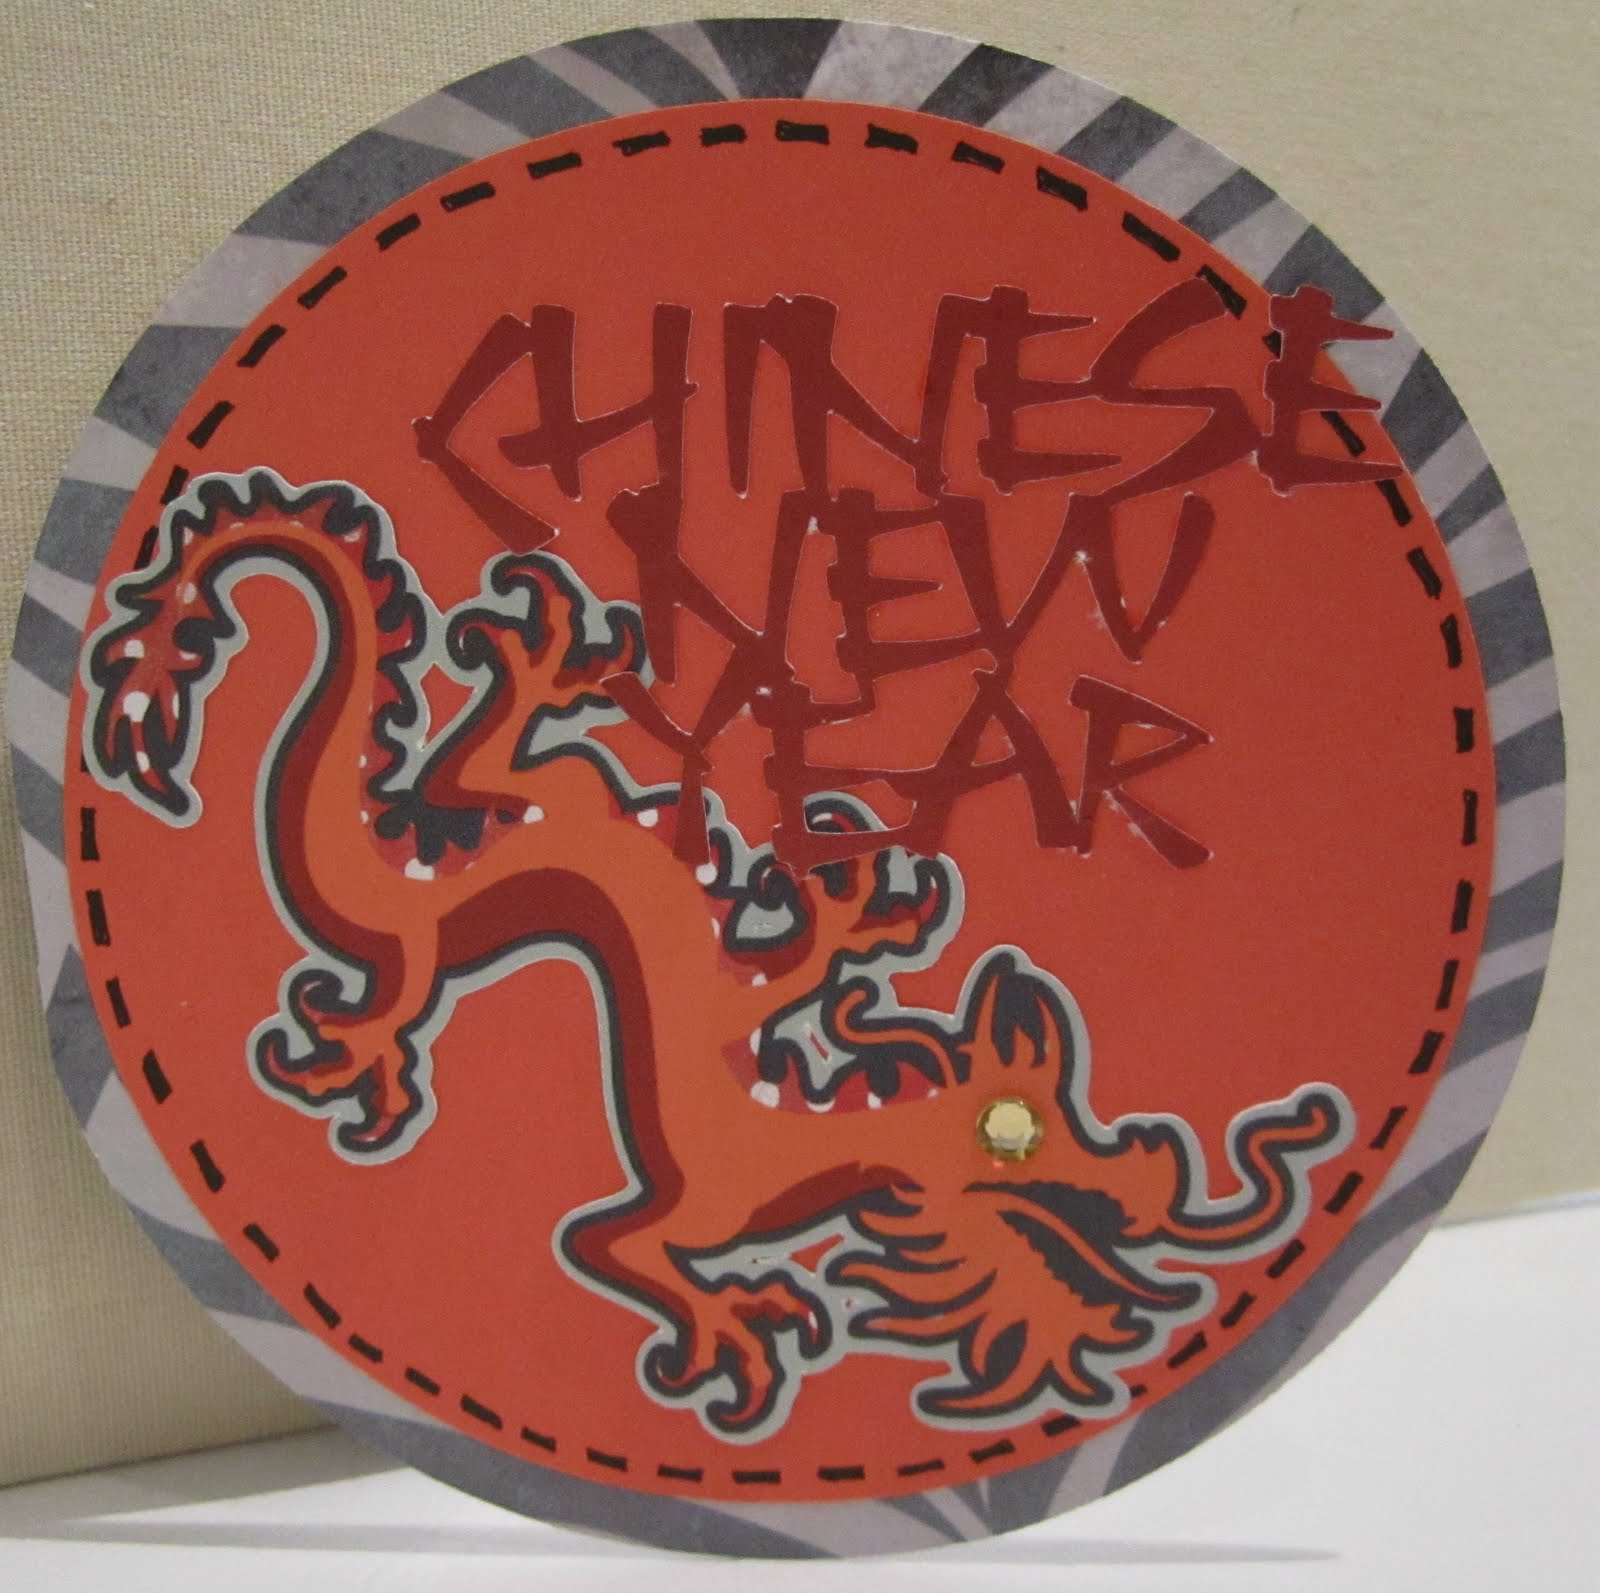
Hi everyone! This week the Imagination Monday Challenge hosted by My Creative Time and Pink Cricut was a tough one for me! The task was to create any project using our Imagine machines with the theme of Chinese New Year.
I am still in awe of the Imagine machine! I can't believe that I made this card using only white paper!
The Imagine cartridge I used was JT. The dragon was an image from that cartridge, I changed the colours of the layers and printed and cut them as one image. All of the other cuts were from regular cricut cartridges, then I used the JT cartridge to print them in colour or pattern to match my dragon.
The circle card is from Wild Card, "Chinese New Year" is from Designer's Calendar and the circle is from George and Basic Shapes.
For some final touches, I added some thick stitching in black pen around the circle and some gold bling for the dragon's eye.
Hope you like it!

Monday, January 3, 2011

#2 Accent Essentials 2011 Card


Hi everyone! I created this card for two challenges:
1. Cricut Circle Blog Weekly Challenge - the challenge this week was to create a shaped card featuring a number somewhere, some bling, and at least 2 Cricut cuts.
2. Fantabulous Cricut - snow or a snowflake on your project.

The circle card was cut from Wild Card at 5 1/2"
The dark blue circle was cut from George and Basic Shapes at 5"
The snowflake was cut from Accent Essentials at 4 1/4"
The inner circle design is also from Accent Essentials, cut at 2 1/4"

Cardstock - Close to My Heart
Glitter paper - Paper Reflections
Bling - IRock by Imaginisce
# Rubons - K&Company

Hope you like it!
This Saturday (January 8th) I am taking part in a Valentine's Day Blog Hop! So if you are looking for some ideas for your sweetie be sure to stop by and join in on the fun - there are over 20 blogs to look at!
Thanks for stopping by!

Friday, November 12, 2010

Penguin Christmas Card


Hi everyone! Here is a card I created for the challenge at Fantabulous Cricut this week. The challenge was to create a project using the colour green and a circle shape somewhere on your project! The cartridges I used for my penguin card were Christmas Cheer, Mini Monograms and George and Basic Shapes. Hope you like it!

Monday, August 23, 2010

Baby Bottle Card


Hi everyone! Here is a card I just finished tonight - a baby girl card! For this card, I used my Gypsy to create a window with patterned vellum over top. The cartridges I used were Gypsy Wanderings for the baby bottle, Gypsy Font for the "baby girl!" George and Basic Shapes for the card outline (resized with G) and Ashlyn's Alphabet for the frame. I used the hide contour feature on the Gypsy to cut out the oval from the frame in the card and to just cut the scalloped part on the vellum.

I am entering my card in the challenge at Made By Momo. This week the theme was "Babies, and Diapers, and Onesies, Oh My!"

Hope you like it!

Friday, August 20, 2010

You're an Angel card


Hello everyone! Tonight I created a card for the Throwback Thursday challenge at My Creative Time The challenge this week is called "Frame It" and we are to use the Paper Doll Dress Up cartridge.
I decided to make a window card with the cute angel. All cuts are from the Paper Doll Dress Up cartridge, except for the actual card which was created on my Gypsy with George and Basic Shapes.
The cloud and stars were made on white cardstock using the Cricut markers first, then cutting. I then coloured in the yellow stars. The garland at the top was five pieces from the Accessories 3 shift feature welded together.
I used my Princess Face Assortment stamps by Peachy Keen for the face on my sweet angel. The "You're an Angel" was stamped using the Tiny Typewriter alphabet set by CTMH.

Hope you like it! Have a great weekend everyone!

Tuesday, May 18, 2010

Nuts About You Card


I created this card for the challenge over at cricutcarzchallenge.blogspot.com
The task was to create a project featuring three circles. The cartridges I used were Create-A-Critter and George and Basic Shapes.

Monday, May 3, 2010

Other NSD stuff

Hi everyone! I had such a great time doing challenges on the weekend! I did a few more on the scrapbeach network as well. These are a few of the projects I completed. Hope you like them!


Wednesday, April 14, 2010

Puppy Get Better Card


I made this card for the Cricut Cardz challenge #21. The cartridges I used are Paper Pups, George and Basic Shapes, and Wild Card. I also used my Design Studio software. First I put two doghouses from the PP cartridge on the DS mat then welded them together to form the card shape, then layered a rectangle over each house piece so it wouldn't cut out the door. I cut out the puppy with the same cartridge, the "Get Better" from Wild Card and the ovals from George. I cut the roof with scissors and placed on the card.