Search This Blog

Showing posts with label Plantin' Schoolbook. Show all posts

Thursday, November 14, 2013

#176 Holiday Frames and Tags - Poinsettia Gift Bag

Hi everyone!  Here is another project I created for the cricut circle swarm challenges.  Number six was to use a cartridge we had never used before.  I have quite a few of these!  I decided to go with Holiday Frames and Tags which was a limited edition cartridge released by Creative Memories in 2012.
 

The tag was cut from Holiday Frames and Tags and the bag was cut from Plantin' Schoolbook.  I embossed the bag with the Holly Ribbons embossing folder before I glued the sides together.


Thursday, June 7, 2012

Altered Marker Tube

Hi everyone! Here is a project I created for the Throwback Thursday Challenge at My Creative Time.  The challenge was to create an altered item using an older Cricut cartridge.

I have this marker tube, that came with my Tim Holtz Distress marker set.  I put the pens in another container so I started throwing odds and ends into this empty container.

This is what I came up with:

I used the Sentimentals cartridge and cut the hand and layers at 3.5". The background shape was cut at 5", and the swirl was cut at 2.5". "Odds & Ends" was cut at 0.5" using the Plantin' Schoolbook cartridge. Hvae you ever cut a font that small? Before I got my Cricut Mini, this was impossible for me with my other Cricut machines. I continue to me impressed by how well this little machine performs! All of the paper layers were attached with Glue n' Seal. I also put a layer over top of everything to seal it.
Products used: Patterned Paper - Tim Holtz (crowded attic)
Cardstock - Core-Dinations (Tim Holtz), Bazzill
Embossing Folder - Tim Holtz
Paper Flowers - I Am Roses
Sprays - Lindy's Stamp Gang
Ribbon - Stampin' Up!
Lace - Unknown
Liquid Pearls
Marker - Staedtler Lumocolor

Hope you like it!

Saturday, March 10, 2012

SweetSassyDiva Blog Hop Day 2 - #151 Playtime

Welcome to the SweetSassyDiva Birthday Blog Hop!


We are celebrating Bobbi Jo's (SweetSassyDiva) birthday this weekend March 10th and 11th. Each day will be a new project and be sure to check out the yummy blog candy giveaways!

I am so happy that you could join us for this super fun Blog Hop showcasing Birthday Themed fun!

You will find an array of ideas along the hop and be sure to become a follower and leave some love aka comments along the way.

This is a TWO-Day hop so, be sure to catch both days for maximum celebration and ideas.

As we spring forward with the time change as well as with Spring coming so soon...let's get this party started! Hop on over to all the blogs along the way!

If you've hopped over from Created By Missie, then you are in the right place. If you've just popped in to visit my blog or are reading this via email and would like to join our SweetSassyDiva Birthday Blog hop and FUN then, please start at the beginning with Bobbi Jo's blog http://sweetsassydiva.com/ because...starting at the start is always SMART! :)

We have a WONDERFUL Grand Prize for one lucky hopper that is donated by Bobbi Jo!


To be eligible, please visit each blog hop stop leaving a comment also, become a follower at http://sweetsassydiva.com/ and be sure to leave a comment!

One random winner will be chosen on Wednesday, March 14th, giving you plenty of time to finish the hop.

For my project on this second day of the hop, I created another little girl's birthday card.


Cricut cartridge I used for my card was Playtime. The background shape was cut at 5.25" and the little girl was cut at 3.5".


The little flower on her dress was cut from Plantin' Schoolbook at 0.75".


I used the hide contour feature to erase her facial features, then used a Peachy Keen Stamps face stamp from the Princess Face Assortment set to create her cute face. I then chalked her some little cheeks as well.


Products used:


Cardstock - DCWV, American Crafts


Patterned Paper - unknown


Baker's Twine - My Mind's Eye


Sweet Birthday Wishes stamp - Scrappy Moms


Happy Birthday Dear You stamp - Stampin' Up!


Markers - Stampin' Up!


Ink - Stampin' Up!


Flower brad - Making Memories


Hope you like it!

Guess what?!?! I also have a giveaway for one lucky winner!


To win this Even More Punnylicious stamp set by My Pink Stamper, please leave a comment on this post and I will choose a winner Wednesday morning! I would also love it if you became a follower of my blog, although that is not necessary to win! No hard feelings :-)

Thank you for checking out my project. I hope that you will become a follower of http://sweetsassydiva.com/ and leave a comment. The fun doesn't end here though so be sure to hop on over to Around the Block with Scrapalette
and remember to visit all the stops for more chances to win!

Be sure to also check back tomorrow for some more celebration and more chances to win!

Here is the complete list in case you get of track:

Bobbi Jo http://sweetsassydiva.com/


Lucy http://love2createitall.blogspot.com/

Michele http://www.michelegreen.com/

Gaby http://www.gabycreates.com/

Mindy http://grammiescraftroom.blogspot.com/

Lori http://scrappinmystressaway.blogspot.com/

Missie http://createdbymissie.blogspot.com/

Jennifer http://scrapaholicjen.blogspot.com/ - YOU ARE HERE!

Paulette http://scrapalette.blogspot.com/

Anita http://www.anitaandbugs.blogspot.com/

Brenda http://happyscrapper64.blogspot.com/

Dana http://papermemories4u.blogspot.com/

Maria http://stampcutcreate.blogspot.com/

Cori http://createdbycori.blogspot.com/

Michele http://chelescrafts.blogspot.com/

Sandy http://thecraftycreationspot.blogspot.com/

Dana Tarchala http://danascraftycorner.blogspot.com/

Jenny http://crazyaboutcricut.blogspot.com/

Suzanne http://cricutcraftingrammy.blogspot.com/

Brenda http://www.friendscraftinwithfriends.blogspot.com/

Shawnee http://quiverofangels.blogspot.com/

Sylvia http://www.bellascrapbookdesigns.blogspot.com/

Friday, November 18, 2011

Baby Sleeping Layout


Hi everyone! I thought I would share a layout I created a few weeks ago using my Imagine machine and the Hey Diddle Diddle cartridge.


All of the patterns and colours are from Hey Diddle Diddle, as well as the cow jumping over the moon, Baby Sleeping and the stars. I cut the cow image in layers and used foam squares under the moon to give the image more dimension.


Both the striped ribbon and blue taffeta ribbon are by Stampin' Up!.


I made this layout at a crop and didn't write down which cartridges I used other than the Imagine one, but I do remember the scalloped border is from Sugar and Spice and the tag is from Plantin' Schoolbook. I'm not sure which font I used though!


Hope you like it!

Friday, July 8, 2011

Summer Fun Blog Hop - #92 Everyday Paper Dolls

Hi everyone! Welcome to Day One of the Summer Fun Blog Hop. If you have arrived here from Short 'N Scrappy you are at the right place! If you have just happened to stop by my blog, you should head over to Creations With Kathryn to start from the beginning! There are so many great projects to see this weekend so you don't want to miss a thing!


For my first project, I decided to create this two page layout of my children the first time they jumped on their new trampoline last summer! That is definitely some good summer fun!


The Cricut cartridges/cuts I used are:


Everyday Paper Dolls - Girl (cut at 4.25"), Boy (cut at 3.75"), Trampoline (cut at 4.25")

Plantin' Schoolbook - Title (cut at 1.5"), Brackets (cut at 2.75")

Four-Legged Friends - Bunny (cut at 3.25"), Frog (cut at 1.75")

Products used:

Patterned Paper - Echo Park

Cardstock - Stampin' Up, CTMH, American Crafts

Border punch - Martha Stewart

Face Stamps - Peachy Keen Stamps

Pens - Stampin' Up!

Hope you like it! Now for some blog candy! This weekend I am giving away this Unity Stamp Company set called "Beach Days and Sun Rays"! To win this set please leave a comment on this post and if you would like to become a follower of my blog that would be great too! Then come back tomorrow for my next Summer Fun Blog Hop post to enter for a second chance to win!


Next, please head over to Vindeloos' This and That to see what wonderful creation she has to show you! Have fun and enjoy the rest of the hop! Hope to see you tomorrow!


Thursday, March 31, 2011

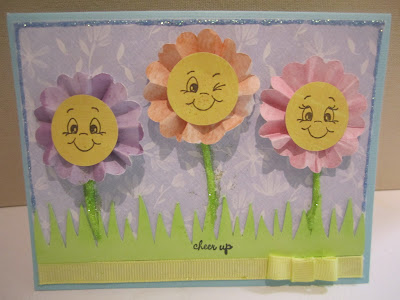
Cheer Up Peachy Keen Card

Hi everyone! Here is a card I created for the Let's Face it Friday challenge at the Peachy Keen Stamps challenge blog. The challenge was to create a project using a handmade flower and Peachy Keen face stamps.
I created my flowers by cutting a 2" scalloped circle with the Mini Monograms cartridge (you can find a scalloped circle on numerous other cartridges as well). I then spritzed it with water so it would be easier to manipulate. Creating a center point, I accordian folded around the circle then used quick drying adhesive to glue the center point to a small circle of scrap paper.

I punched a 1" yellow circle then used the Peachy Keen Stamps Everyday faces set for the faces.

I used a quick drying white glue and green glitter for the stems.

The grass was cut from Plantin' Schoolbook and sized on my Gypsy to be 5.25" in length.

I added light blue stickles around the edges, yellow grosgrain ribbon along the bottom and a "cheerup" sentiment as a final touch.

Hope you like it!

Thursday, February 3, 2011

#30 Plantin' Schoolbook - Teacher Valentine

Hi everyone! It was exactly one month ago that I announced my goal to use all of my cartridges at least once each this year. I'm already on #30 so as long as I stay on track, I should be able to do this easily! I have purchased 8 more, won 1 and ordered 2 from Cricut Rewards, so that will put my total at 163 - only 133 to go in 11 months!
Anyway, my project for today is a card that I created for the weekly challenge at the Cricut Circle Blog. The challenge was called "Back to the Basics" which meant we were to use only the cartridge that came with our machine. Since I have more than one machine, I wasn't sure which I would go with and decided to choose my favorite machine, which was my first Expression. I bought my E at Walmart in 2008 and it only came with one cartridge - Plantin' Schoolbook. This is my card with a matching envelope:


Here are the cuts I made from the Plantin' Schoolbook cartridge:
Card - 6"
Envelope - 6"
Apple - 2 3/4"
Hearts - 1"
Scalloped Border - 1/2"
"teacher" - 1 1/4"
Part of the cut design of the card was a border of holes along the edge so I used pink embroidery thread and some red fiber to stitch in the holes.
Hope you like it!