Search This Blog

Tuesday, June 28, 2011

#90 Makin' the Grade - Travel BINGO!

Hi everyone! Here is fun project that I just finished up for the Cricut Circle Blog monthly challenge. The theme this month was "On the Road Again" and the task was to create a project to be used during a road trip. The first thing I thought of was BINGO because my siblings and I used to create BINGO cards for traveling then swap them for a game. Ours were a lot more difficult than these though! No one wanted anyone else to win - I remember UFO and kangaroo being on someone's card LOL. I created these books with two of my children in mind - my daughter is almost 8 and my son is 4, so his a little bit easier :-).


To create the books, rather than using up my white cardstock (I need that for my Imagine :-)), I used patterned paper from my stash that I didn't really care for. You know those huge paper stacks you bought when you first started scrapping that always had stuff in them that you were never gonna use? Anyway, I cut each piece at 6"X12" and glued them patterned sides together to make the pages. Each page was folded in half, they are all stacked together. I then used my Crop-a-dile Big Bite to punch the holes for the binding. So simple!


For the cover I used the Makin' the Grade cartridge for the font and shadow, cut at 1.5", and welded the words together on my Gypsy.


The car is from the Beep Beep Lite cartridge and is cut at 1.75".


The stars (1.25" and 0.75") and hearts (1.5" and 1") are from George and Basic Shapes.

For the inside pages I used Designer's Calendar to create the grid, I just cut off the excess because the one on the cartridge, being meant for a calendar, had too many squares. The grid was cut at 5".

"BINGO" was also from Makin' the Grade and was cut at 0.75".


And I think that's it! Hope you like it! If you have any questions, feel free to ask!


Sunday, June 26, 2011

A New Cricut Challenge Blog!!!


Hi everyone! Just wanted to let you know about a new challenge blog starting up! It is called Cricut 360 and the first challenge begins on July 1st! Can't wait to see what it is! To check out this fun new challenge blog click HERE

Sea You Soon!


Hi everyone! This card was made for the Tacky Tuesday group challenge on Facebook. The theme this time was Sea Creatures and we had to use the word "Sea" in our sentiment.


I chose these fish from the Life's a Beach Cricut cartridge. The wave was made with the wavy cutter by Creative Memories. All paper used is from my scraps stash.


Hope you like it! If you have not entered in my 5oo follower giveaway, be sure to click HERE to check it out! The giveaway is open until July 4th!

Hello Friend!


Hi everyone! Here is a card I created for the latest challenge at the Pollycraft Challenge Blog. The challenge theme this week was Travel/Holidays (vacation). I chose to use this cute Cuthbert image by Pollycraft for my card. I coloured the image with my Copics.


Patterned Paper - CTMH


Ribbon - Making Memories


Sentiment stamp - G Studio


Hope you like it! By the way, there is still another week left to enter my 500 follower giveaway! Click HERE to enter!

Sunday, June 19, 2011

Chirp Up!

Hi everyone! This week on the Pollycraft Challenge Blog, the challenge was "Ribbons and Flowers". They are also having a Design Team call and are offering up two freebies to chose from to use on your project to participate in that contest.


I chose to use this cute little birdie digi, which is one of the freebies being offered. I coloured the image with Copic markers.

All papers were printed using the Cricut Imagine with the Blast Off cartridge.


The sentiment stamp is from My Pink Stamper's "Tweetie Hoo Puns" stamp set.

Hope you like it!

Saturday, June 18, 2011

#89 Billionaire - Happy Father's Day!

Hi everyone! Yesterday I created for the weekly challenge on the Cricut Circle Blog. The task this week was to create a Father's Day card using this sketch:


Here is my creation:


For my card I used the Billionaire Lite cartridge along with the JT Imagine cartridge for the patterns and colours on the card.


Background - cut at 5.3"


Tie - cut at 2.5"


"Dad" - cut at 1.3"


Circle (from George and Basic Shapes) - cut at 3".


The sentiment is from the My Creative Time stamp set "You're my Best Buddy"


Hope you like it!


P.S. I will have my 500 follower giveaway ready on Monday so be sure to come back to enter!

Friday, June 17, 2011

#88 Meow - Happy Happy Birthday!


Hi everyone! Here is a card I created for the latest Throwback Thursday challenge at My Creative Time. For this challenge we were asked to create a project using any of the Cricut "Lite" cartridges and some bling.


I chose to use the Meow cartridge, which I have had for a while and still never used. This cut came out super cute!


I added some purple stickles for the kitty's collar and the bird's wing, then a jewel to the collar and for the birdie's eye.


The sentiment is from the My Creative Time stamp set "WOW So Many Candles".


Hope you like it!

Friday, June 10, 2011

#87 Sentimentals - Welcome Sign

Hi everyone! I am still not making many posts on my blog but I have been doing some crafting in between soccer games, school functions, swimming lessons and piano with the kids! This is a Welcome sign I created for one of the Cricut Circle Magazine challenges this month. For this challenge we were asked to use one of the May Magazine projects for inspiration to create our own project. I chose to use Aphra Bolyer's welcome sign for inspiration for my project. Her sign was shaped like a gate and had flowers and the word "welcome" on the front of it. My plan originally was to create something very similar to her project, I was just going to use the fence instead of the gate, but the ideas started flowing and I came up with this instead!


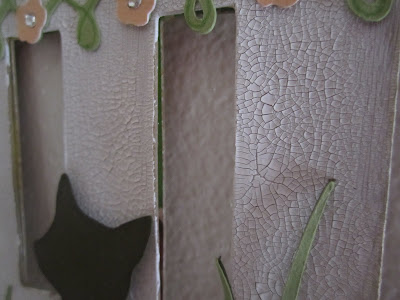
The base for the fence was cut twice from a cereal box to create two layers, giving it added support. The plaque was cut from heavier chipboard. I found a large piece the the back of one of my child's floor colouring pads. The fence was painted with Picket Fence Tim Holtz Distress crackle paint. The plaque was covered in flocked patterned paper. The swirls are fuzzy!


Here are the cartridges, cuts and measurements I used on my sign:


Sentimentals - plaque shape (cut at 14"), scalloped circle to create large flowers (cut at 2" real dial size)


My World - fence (two welded together cut at 5.5")


Nursery Rhyme - "WELCOME" (cut at 2")


Kate's ABCs - wagon (cut at 4"), watering can (cut at 3.5"), cat (cut at 3")


Elegant Cakes - vine border (cut at 1")


The three shapes along the bottom were attached to the fence using 3D foam squares. I added some I-Rock bling here and there for a little something extra.


I had so much fun creating all of the flowers on my project! Each larger flower was made using 8 - 2" scalloped circles. I inked all of the edges and spritzed with water to make the cardstock easier to manipulate. The circles were stacked then attached together through the center with a brad. One circle at a time was the scrunched up towards the center to create the petals.


Each rolled flower was created from circles that I cut by hand at around 3". I cut the circle into a spiral, rolled it tightly and glued the end to the bottom - this one's addicting! :-)


Here's a close up of the crackle paint on the fence - cool, right?


Well, I think that's it. Hope you like it! If you have any questions on my project, please let me know in a comment and I will get back to you! Thanks for coming by!


Tuesday, June 7, 2011

#86 Tinkerbell & Friends - One Year Old

Hi everyone! Today I have to show you a birthday card I created for my sweet little niece Bentley who turns one year old next week! This is our little angel here:


For the birthday card I decided to use the Tinkerbell cartridge, which honestly is one of my LEAST favorite cartridges because of the impossible tiny layers. HOWEVER, this time, I didn't have too much difficulty with it. Could be because the Expression 2 cuts much cleaner than my other Expression or maybe because I cut Tinkerbell at 5".


The challenge this week at My Creative Time was to create project using an older cartridge along with the colours green and yellow - perfect for Tink!


Along the edges of the card I stamped the borders with Lavender Lace (SU!) ink and Versamark, then used Heat & Stick powder (SU!) to add Dazzling Diamonds (SU!) to the stamped image. The border stamp is from the Botanical Borders set by CTMH.


Hope you like it!


Saturday, June 4, 2011

#85 Dinosaur Tracks - Dinosaur Hunt Mini Album

Hi everyone! Today I have for you a dinosaur mini album I have been working on for my son. There is a new dinosaur park near where I live called Jurassic Forest and I can't wait to check it out with my family! I made this mini for all the pictures I take there of my son! Yep that's right, I make projects ahead of time for photos, yet am sooooo far behind on scrapbooking photos I have already taken LOL.

I created this for one of the Cricut Circle Magazine challenges this month. The challenge is to create a project using the Cricut machine and products by one of their sponsors, Imaginisce. This was quite easy for me since I LOVE this company and had a few of their lines in my stash to choose from. The paper collection I chose to use is called Dino-Roar. For my book, I used mainly the Dinosaur Tracks cartridge. The book shape is made from one of the fossil shapes cut at 4.5". All of the bases for the pages were cut from cereal boxes that I have been saving - they sure come in handy on projects to use in the place of chipboard! I find them super easy to cut with the Cricut too! (Blade Depth 6, Pressure 5, Multi-cut 2 with regular blade)
The footprints are from a fossil cut as well, cut at 4.5".
The T-Rex was cut at 3", first from cereal box, then cardstock layers to give it some extra sturdiness. He is attached to the cover with foam squares.
On the front cover, the Imaginisce products used are:
Dino-Roar patterned paper
Dino-Roar Adhesive Strip Borders
Dinosaur Ribbons
Dino-Roar Denim Stickers
Dino-Roar Rub-ons


For my next pages, I made pockets from patterned paper. The tags are circles cut from George and Basic Shapes at 3" (inner circle is 2.5"). I added a cardstock tab and some green Fab Brads by Imaginisce. On the back I added some dinosaur fossils from the Dinosaur Tracks cartridge, all sized differently to fit in the 3" circle.


On these pages I added a photo mat and some of the Denim Stickers.


On these pages I added a photo mat to the left page. The dinosaur, from Dinosaur Tracks, is cut at 2" and adhered to the page with foam squares.


The tag is cut from Fabulous Finds at 2". To the tag I added some of the dinosaur ribbon and a rub-on saying (both from the Dino-Roar collection).


The journalling stamp is also by Imaginisce.


The tags on these pages were cut from Picturesque at 3". I added dinosaur ribbon, decorative staples, buttons, Dino-Roar rub-ons, and Dino-Roar denim stickers. The green pattern on the front of the tag is actually cut from the packaging of the Denim stickers. The strip to hold the tag in is one of the Dino-Roar adhesive strip borders with the backing left on.


The dinosaur on these pages, also from Dinosaur Tracks, is cut at 2.5" and adhered to the page with foam squares.


I used the journalling stamp again as well as the "Stomp Stomp" Dino-Roar rub-on.


The photo mat on the opposite page is cut from Once Upon a Princess at 3.25". On these pages I also used adhesive strip borders, some buttons from my stash and paper yarn from my stash.


On the back, I made a border from on the the patterned papers, as well as an accordian folded strip for photos. The dinosaur, from Dinosaur Tracks, is cut at 2.5" and adhered with foam squares. I also added some of the Dino-Roar rub-ons to each side. Before attaching the photo folder, I put some of the dinosaur ribbon around it and tied it shut.


Well, I think that's it! Hope you like it! If you have any questions about my album, feel free to contact me and I will do my best to help you out! Thanks for stopping by!