Search This Blog

Tuesday, October 25, 2011

#132 Chic and Scary - Halloween Door Sign

Hi everyone! This is the proect I made for the October monthly challenge on the Cricut Circle blog. The challenge was to create a Halloween home decor project with our Cricut machines.


I found this metal sign on sale at Michael's and decided to add some Cricut images to it with vinyl.


I used the Chic and Scary cartridge for my design. The witch was cut at 5", Beware was cut at 2", the spider web at 3" and the spider border at 1".

I tied some ribbon to the wire hanger. The Halloween polka dot is from Michaels and sheer ribbon is from Dollarama. The sheer ribbon was a great find - it has silver metallic spiders all over it!

Hope you like it!

Monday, October 24, 2011

#131 Cuttin' Up - Baby Girl for Jenae


Hi everyone! Here is another layout that I created last weekend. It features my daughter and her first baby girl cousin Bentley.


For this layout, I used the Cuttin' Up cartridge for the title.


I used the Art Philosophy cartridge for the flowers.


Hope you like it!


#130 Recess - Hurray for School!

Hi everyone! Last weekend I attended a crop and got a few layouts done so I will try to get them posted today!

This layout is of my boy Drew starting his first day of preschool in September 2010. He was so excited!

I cut the boy reading and the paint pallet from the Recess Lite cartridge. I used the hide contour feature on my Gypsy to erase the face from the little boy and added a Peachy Keen face stamp instead.

The font is from Cuttin' Up.

Hope you like it!


#129 Joys of the Season - Christmas Card Swap

Hi everyone! Some of the ladies on the Cricut Circle messageboard are having a Christmas card swap and this is the card I created for that. There are 17 ladies participating in this swap. Each participant makes 17 cards, sends them to the hostess, then we all receive 17 different cards back. Can't wait to see what everyone has created!


The ornament on my card is cut at 4" and is from the Joys of the Season cartridge.

I used double-sided tape around the edges of the card base, making sure all edges were covered, then sprinkled the adhesive with Glitter Ritz.


The red cardstock (SU!, Real Red) was cut at 4"X5.25". I ran it through my Cuttlebug using the Season's Greetings embossing folder. To accentuate the raised image, I ran a white pigment ink pad (CTMH) over top.


I coloured the stamp (Stampin' Up!) with Stampin' Up! markers (real red, cherry cobbler, always artichoke) then stamped it on the ornament. I ran the ornament through my Xyron so the adhesive would be on the front of the card, attached the gold ornament topper, then sprinkled it with transparent Glitter Ritz.


I then attached a bow made from Real Red taffeta ribbon to the top of the ornament.

On the inside of the card, I stamped the sentiment (Stampin' Up!) with Chocolate Chip ink (SU!) and used my markers (Cherry Cobbler, Always Artichoke, Chocolate Chip) to colour the pinecone stamp, then stamped it in the corner.


Hope you like my card!

Sunday, October 23, 2011

#128 October 31st - Beware


Hi everyone! Here is a Halloween card I created for the challenge at Cricut 360. For this challenge we had to create a spooky project using the colours green orange and purple.


The word "Beware" (1"), the gate (4.25") and the spider (1.25")were all cut from the October 31st Cricut cartridge.


The photo corners were cut from Jasmine


The patterned paper is by Martha Stewart Crafts from a paper pad I purchased last Halloween. I used an identical paper as the background to cut the little characters out of, then attached them over with foam squares.


Hope you like it!

Tuesday, October 18, 2011

#127 Sweet Tooth Boxes - Halloween Treats

Hi everyone! Here is a project I created for a few challenges this week. I used the Sweet Tooth Boxes and Mini Monsters cartridges to create this cute treat box for someone who I will not name because then she wouldn't be surprised ( I am actually going to make three of them).


I had such a fun time creating this box! It was my first time putting together anything from the Sweet Tooth Boxes cartridge, and it is really quite easy thanks to the detailed, illustrated directions included with the cartridge. Soooo thankful for that!


My box was cut at 7.25". I covered parts of it with patterned paper.


The monsters were cut at 2 and 2.25" to fit on the end portions of the box.


"Treats" - cut at 2"


Patterned Paper - Close to My Heart


Cardstock - Bazzill, Close to My Heart, Stampin' Up!


Stickles

The challenges I am entering in are:

Cricut Circle Blog - create a project to give someone special as a gift.

Fantabulous Cricut - create project with the colour purple and a monster or bug.


My Pink Stamper - make a goodie bag or 3D item for any holiday.

Hope you like it!

Spider Halloween Card


Hi everyone! Today I have a cute Halloween card to show you that I created for the latest Throwback Thursday challenge at My Creative Time. This week Emma asked us to create a Halloween - themed project using the card feature on one of the Cricut cartridges.

I chose to use Doodlecharms because I just love the cute Halloween images on that cartridge!


Using the card feature, I sized the spider card on my Gypsy so that it would cut at 5.5" wide. My spider on the inside was cut at 2.25".


Products used:


Patterned Paper - Bo Bunny Press


Ribbon - Michaels


Buttons - from my stash


Chunky Glitter - Doodlebug Designs


Xyron


Googly Eye


Hope you like my card! At the end of this week, Emma is releasing another series of her fabulous stamp sets! All week, you can check out her sneak peeks at My Creative Time. Be sure to check them out! Thanks for stopping by my blog!

Sunday, October 16, 2011

Halloween / Trick or Treat Blog Hop Day 2 - #126 Simply Scarecrow

Hi everyone! Welcome to Day 2 of the Halloween / Trick or Treat Blog Hop! If you have come here from A Scrap Above, you have come to the right place! If you have just happened to stop by my blog, please head over to Creations with Kathryn to start hopping from the beginning!

For my project today, I have created some Halloween goodie bags for the children in my son's preschool class.


For these treat bags I used ziploc baggies from Dollarama and made toppers by cutting 4"X4" squares of patterned paper, then folding them in half. The pumpkin is from the Simply Scarecrow Cricut cartridge, cut at 3".


All paper and cardstock is by DCWV.

The stamped sentiment is my My Pink Stamper.


Hope you like my project for today and that you are enjoying all of the other great projects on this hop! You next stop is Amy Designs. If you get lost along the way, or there are posts missing, please go to Creations with Kathryn to view the complete line-up.

Thanks so much for stopping by!


Friday, October 14, 2011

Halloween / Trick or Treat Blog Hop - #125 Pumpkin Carving

Hi everyone! Welcome to the Halloween / Trick or Treat Blog Hop! This is a two day blog hop where you will find a ton of fabulous ideas for your Halloween crafting! If you have arrived here from A Scrap Above, you are at the right place! If you just happened to stop by my blog, please head over to Creations with Kathryn to start at the beginning!


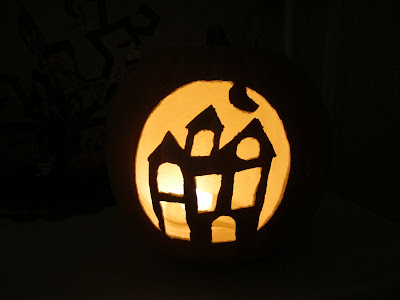
For my project today I decided to carve a pumpkin using one of the templates from the Pumpkin Carving Cricut cartridge.


I bought one of those foam pumpkins from Michaels and a pumpkin carving kit from Walmart last year and never got around to doing anything with it until now.


I cut the design for the pumpkin at 5.75" on vinyl, then stuck the vinyl to the pumpkin. I then used the very DULL tools from the carving kit to carve the pumpkin. I had to make small slits with a paring knife to get the cuts started. In hindsight, I should have been using an X-Acto knife, my cuts would have been a lot cleaner. I wish these smart thoughts would come to me while I am actually in need. LOL I know for next time!


Hope you like it! Your next stop on the hop is Amy Designs. Enjoy the rest of the blog hop and hope you can make it back tomorrow!


Thursday, October 13, 2011

Spooky Tree!

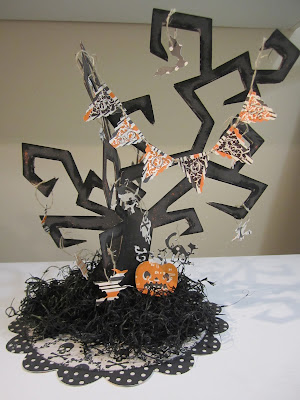
Hi everyone! The challenge this month for the Cricut Circle Magazine was to create a project using Echo Park product with at least 4 cuts from our favorite Cricut cartridge! I have mentioned numerous times before that I have no one favorite cartridge - I am an addict who loves ALL of her cartridges! My favorite is usually what I am in the mood for at the moment. Since I am in Halloween mode, I thought I would choose a Halloween theme and my favorite Halloween cartridge is Happy Hauntings! For Echo Park product I chose the Apothecary Emporium line.


Anyway, I decided to make this 3-D spooky tree from the Happy Hauntings cartridge and I am soooo excited about how it turned out! Love Love Love!!!

The cartridges / cuts I used are:

Happy Hauntings


The tree was cut at 11.5". I cut it from patterned paper, chipboard and black cardstock to make it heavy enough to stand. I used a black paint dabber to finish the edges.


Ornaments - Ghosts (1.25"), Witches (1.25"), Bats (1"), Skeletons (1.5"), Cats (1.25")


Font on Banner - "Spooky" (0.75")


Pumpkin (2.25")


Poison (2")


Birthday Bash


Scalloped Banner Pennants (1.25")


Bloom


Scalloped Circle for Base (9")


George & Basic Shapes


Circle for Base (7.5")


For the grass, it was originally green and I put some in a ziploc, poured in some Tattered Angels Glimmer Glam, and rubbed the bag until the grass was thoroughly coated. You can't really tell from the photos, but it is quite sparkly!


All patterned paper used is by Echo Park from the Apothecary Emorium Collection. The banner pennant are stickers from the same collection.


Hope you like it!

Wednesday, October 12, 2011

#124 Love You A Latte

Hi everyone! I finished up the last Blog-iversary challenge tonight from the Cricut Circle Blog! The challenge was to create a project using the following sketch:


And here is my creation:

For my card, I used the Love a Latte cartridge. I cut the circle at 2", the coffee cup at 1.75", and Love a Latte at 1.75".


Hope you like it!

#123 New Arrival - Baby Card


Hi everyone! I created this BABY card for the 5th challenge at the Cricut Circle Blog celebrating their Blog-iversary. It's a recipe challenge and the task is to create a project using 1 title, 2 or more Cricut cuts and 3 or more buttons.


The cartridge I used for my card is New Arrival.


The BABY blocks are cut at 1.25".


The rattles are cut at 1.75".


I threaded some brown fiber through the holes in the buttons and used them to cover the round part of the rattles.


The argyle and striped patterned paper is by Stampin' Up!


Imagine Card with Hey Diddle Diddle!

Hi everyone! Tonight I finished up the 4th challenge for the Blog-iversary of the Cricut Circle Blog. The challenge was to create a project using the Imagine. We needed to use a pattern for the background, then cut an image in layers.


My newest Imagine cartridge is Hey Diddle Diddle and I could not wait to try it out! The images are soooo adorable!
For the background of my card, I cut the pattern as a 5.5" square, then trimmed it to card size ( 4.25" X 5.5").


The background shape was cut at 5.25".


The monkey and layers are cut at 3".


The "Happy Birthday" bubble is from an elephant image on the same cartridge.


Other supplies:


White Cardstock - American Crafts


Large Brads


Stickles


Ribbon


3D Foam Squares - Stampin' Up!


Tuesday, October 11, 2011

#122 Winter Woodland - Christmas Card

Hi everyone! For the third Blog-iversary challenge at the Cricut Circle Blog, the task was to create something with the Cuttlebug as a main focus.


I decided to use the Season's Greetings embossing folder for the background of a Christmas card.


I started by using the Season's Greetings folder on a 4" X 5.25"sheet of red paper. I then gently rubbed a white pigment ink pad over the top to bring out the embossed image.


I cut out a 1.25" snowflake from Winter Lace, used the Xyron to add glitter and attached it to the paper with a foam square.


The tag was cut at 1.5" from white cardstock using the Art Philosophy cartridge. I used the Swiss Dots folder then gently inked the dots with red ink. I put a red eyelet in the top of the tag, then attached it to the card front with gold ribbon.


The poinsettia is cut at 1" from Winter Woodland.


I ran the white card base through my Xyron machine, attached the card front in the center, then glittered the edges with ultra-fine glitter.


Hope you like it!

#121 Damask Decor - Bountiful

Hi everyone! Hopefully you will see me posting a few projects today as I try to finish up the Blogiversary challenges for the Cricut Circle Blog! This pumpkin card is for the 2nd challenge, which was to create a project using a monochromatic colour scheme.


As soon as I saw the challenge, I knew I wanted to use Damask Decor for the main Cricut cut. I found this awesome pumpkin cut and decided to make a Thanksgiving cartridge with it. I then sorted through my stash of paper scraps to find a few pieces that went well together.
The cartridges / cuts I used are:


Damask Decor - pumpkin design (cut at 4.75")


Thanksgiving - Bountiful (cut at 1.25")

I covered the pumpkin with Glossy Accents and added some leaf brads to the upper corners.


Hope you like my card!


#120 Calligraphy - Happy Birthday tag


Hi everyone! Hope everyone had a fantastic weekend! Canadian Thanksgiving was yesterday so I had a lot of fun spending time with my wonderful family!


The latest Throwback Thursday challenge at My Creative Time, is to create a project using a font cartridge. I noticed that I have never used Calligraphy yet on a project for my blog so I decided to go with that one.


I made the tag at 5", and using my Gypsy cut the flower design in it at 2.5". I then cut another tag at 5.25", hiding the cut out shapes in the top with the hide contour feature. Happy Birthday was cut at 1.75".


I then added some stickles to the heart, some plastic Prima flowers and stitched around the tag with a Stampin' Up marker.


Hope you like it!

Thursday, October 6, 2011

#119 Pop-Up Neighborhood - Haunted House card

Hi everyone! Here is a card that I created for a couple of Cricut Circle challenges! The last challenge of the Canadian Cricut Circle Online Swarm was to create a 3-D haunted house and embellish it with Cricut cuts.


This week at the Cricut Circle Blog, they are celebrating their one year blog-iversary by hosting daily challenges. The first challenge, posted on Monday, was to create a project using one of our exclusive Circle cartridges. I chose to give Pop-Up Neighborhood a try. I have been pretty intimidated by the pop-up feature on this card, but turns out it is really not that difficult after all!


The cuts / cartridges I used are:


Pop-Up Neighborhood - house, layers, card (4"), fence (1"), note card (3")


Chic & Scary - pumpkin (.75")


Happy Hauntings - "Enter if you Dare" (3")


Other supplies:


Cuttlebug Folder - mosaic texture


Patterned Paper, Glitter - Martha Stewart Crafts

Cardstock - Core-dinations Black Magic


Stamp - Inkadinkadoo


Wire


Hope you like it!