Search This Blog

Monday, January 31, 2011

#28 Easter 2010 - Little Lamb and Blog Hop Winner!


Hi everyone! This is a card I created for the Wacky Wednesday challenge at More Than Favors. Paula asked us to create a project using the colours Brown, Green and Pink!

All cuts from my card are from the Easter 2010 cartridge! Isn't the lamb adorable? I think so....

Her little face is stamped from the Peachy Keen Stamp set Critter Faces, Medium.

I used more of that "fur" printed paper that I used a few days ago on my Bear in the Trash Can project. I knew I was holding onto that for 8+ years for a reason LOL!

I used my Stampin'Up markers for the detailing.
Hope you like it!
Now... onto the winner of my blog candy from the Birthday Blog hop:
Random . Org has chosen:
VinDeeLoo - congratulations! I will email you shortly to get your shipping address!
Thank you everyone for your support on my blog - I really appreciate it! Please keep coming - I will be in another fun blog hop this Saturday called "Think Spring". I know it's a bit early but when you live where I do, you are thinking about spring as early as October LOL.

Have a great week everyone!

Sunday, January 30, 2011

#27 Create a Critter - Say Cheese!


Hi everyone! I'm back with yet another challenge entry to show you - I've been busy crafting this weekend! I created this card for the Cricut Cartridge Chaos Challenge. The cartridge they chose last week was Create a Critter - one of my favorites! I haven't used this mouse yet and wanted to send it to a friend of mine as a little joke since she has just discovered a mouse in her house. I'm glad it's her house and not mine :-)

The mouse, cheese and "say cheese" are from Create a Critter and the background piece is from Lacy Labels.
Hope you like it!

#26 Alphalicious - Blast Off


Hi everyone! If you are looking for the Birthday Blog Hop, click here.
Here is a card I made for the Music Mondays challenge. The song choice this week was "Satellite" by Guster. The task to create a project featuring, sun, moon, stars, etc.
I chose to make a birthday card for a little boy.
The rocket is cut from the B is For Boy cartridge at 3 1/2".
"Blast off" was cut from Alphlicious at 1" and welded together on my Gypsy.
I used my decorative scissors to create the zigzag borders.
Hope you like it!

#25 Simply Charmed - Birthday Blog Hop Day 2!

Hi everyone! Welcome to day 2 of the Birthday Blog Hop! You should have arrived here from In Love With Paper. If not, please go to the beginning at Fantabulous Life and make sure you wish Kristen a HAPPY BIRTHDAY!!!!

On this SECOND day of the hop I decided to make a birthday card using the Simply Charmed cartridge.


The cake was cut at 3"

All paper, ink and markers are by Stampin' Up.

The "Sweet Birthday Wishes" is a stamp by Scrappy Moms.

Hope you like it!

Well since I am the last stop on the hop, hope you had a great time with us this weekend! I still have blog candy up for grabs so leave a comment here to be entered to win it! If you missed yesterdays post, please click here or scroll down to leave a comment on that post to be entered again for the prize! I will be using Random.Org to choose a winner on Monday morning (ish)
I would really like to thank Kristen for letting me help celebrate her birthday with all of these talented ladies - it's been a blast! Happy birthday Kristen!

#24 Just Because Cards - Love You a Latte


Hi everyone! For the Birthday Blog hop Day 1 post, please scroll down or click here.

Here is a card I created for the latest challenge at Fantabulous Cricut. The challenge this week was to create a project using a neglected cartridge. I have had the Just Because Cards cartridge since it was first released and this is the first time I have ever used it! There are a ton of cute cards on there! I decided to use this coffee pot card and turn it into a Valentine. Cute!
Everything was cut for the 5" size, with the exception of the coffee pot on the envelope which I wanted to make smaller than the card version. It was cut at the 3" card size.
Hope you like my project and if you have cartridges that you have been neglecting, this is the perfect opportunity to pay attention to one of them! Thanks for stopping by!

Saturday, January 29, 2011

#23 Gingerbread - Scraplift Challenge

Hi everyone! If you are here for the Birthday Blog Hop, please scroll down to the next post!
The January challenge at the Cricut Circle Blog was to create a project scraplifting one of the many projects featured on the blog in the last few months. There are sooooo many to choose from. The projects over there are ALL amazing! Since I am mainly a scrapbooker at heart, I decided to chose a layout to scraplift. I went through EVERY entry over the last four months and finally decided upon this layout:


This beautiful layout was created by Nancy Damiano and posted on Decmeber 6, 2010. I just love the gingerbread cuts and had never used my Gingerbread cartridge before so I decided I had to scraplift this layout!

Here is my version:


Our gingerbread borders are identical but I had to improvise on other elements.

The cartridges I used are:

Gingerbread - Gingerbread cutouts (cut at 2 1/4")

Winter Frolic - Snowman (cut at 2 3/4") I think Nancy's snowman was a sticker (?)

Mini Monograms - scalloped circle (cut at 3 1/4" and 2 3/4") She used the Heritage cartridge.

Base Camp - "gingerbread" (cut at 1 1/4") Nancy used Plantin' Schoolbook.

Doodletype - "house" (cut at 1 1/4")

I even found some ribbon almost identical to Nancy's!

Cardstock - Bazzill Basics

Patterned Paper - DCWV

Brads and gingerbread ribbon - American Crafts

Hope you like it!

Birthday Blog Hop!!!!!

Hi everyone! Welcome to Day 1 of our Birthday Blog Hop celebrating Kristen's birthday. If you just arrived at my blog, you will want to start at the birthday girl's blog My Fantabulous Life. If you were already on the hop, if you came from In Love With Paper, then you are at the right place. I am the last stop on the hop!
For my project today, I chose to create a gift notebook for recording birthdays. It's great to have a reminder so you're not sending out those birthday cards at the last minute (like I do!).


All pages are cut to 6" square.


Cricut Cartridges:


Mother's Day - floral design and note paper on cover


Martha Stewart Elegant Cake Art - "Birthdays"


Birthday Bash - Balloons


Sweet Treats - Cake


Other supplies:


Patterned Paper - Little Yellow Bicycle


Cardstock - Close to My Heart, Reflections, Bazzill


Stamps - Close to My Heart


Ink - Close to My Heart


Markers - Stampin' Up


Bling - My Mind's Eye


Vellum Quotes - DCWV


Bind-it All
Hope you like it!


Here is the list of the bloggers participating in this hop in case you missed someone along the way:


4) Nuts about Cuts http://www.nutsaboutcuts.com/


Now for some blog candy! To win this little birthday themed package, please leave a comment on this post and I would love it if you would become a follower, if you are not already. :-) Thank you and good luck!

Hope you all enjoyed DAY 1 of this special blog hop! Hope to have you all back tomorrow for some more fun! Happy birthday Kristen!

Thursday, January 27, 2011

#22 Give a Hoot - Keep it Clean


Hi everyone! Here is my entry for the Flaunt it Fridays Challenge. The task was to create a project using the bear in the trash can from the Give a Hoot cartridge.
I chose to make this frame for my little girl who seems to have to clean her room an awful lot!
I cut the bear at 5". I even dig into my stash - WAAAAAAYYYYY into my stash to find the "fur" patterned paper (by Provo Craft).
"Keep it Clean" was cut at 2 1/2".
The background patterned paper is by DCWV.
The frame was a plain wooden one from Michaels that I painted with pink paint, then stamped with black paint using the swirl fropm the Baroque Motifs stamp set by Stampin`Up!
Cardstock is by Bazzill
Bear face stamp by Peachy Keen (Critter Faces - medium)
Hope you like it!

#21 Ashlyn's Alphabet - I Feel Pretty


Hi everyone! The weekly challenge this time at the Cricut Circle Blog was to create a layout with a BABY theme - not actually about babies, but this:

B - Brads
A - Aqua
B - Butterfly
Y - You

We were to create a layout with the spotlight on ourselves. When I saw that the colour aqua was to be used I immediately thought of my sister's wedding because her main colour was a sort of aqua colour (I say sort of because Leila insisted that it was not actually aqua, although pretty sure it was...sorry L):-)

I had a certain picture of myself wearing my bridesmaid dress in my mind when I created this layout so I went ahead and put it all together. When I went to print it out, I could not find it on my computer or on any of my discs. Huh? So I had to use this one which unfortunately does not really show the dress at all. And trust me you are missing out on seeing a whole lotta dress since I was two weeks away from my due date and pretty HUGE!

For this layout I used the Ashlyn's Alphabet cartridge:
"I Feel" - cut at 1 1/2"
"Pretty" - cut at 2 1/4"
Butterfly - cut at 3 1/2"
Rectangle frame - cut at 3 3/4"
Crown - cut at 1"
Square note frame - cut at 3 1/2"

I accented the corners of the journaling rectangle with crystal brads and the body of the butterfly with some epoxy brads.
Hope you like it!

Wednesday, January 26, 2011

You are in My Thoughts - Black White and Grey


Hi everyone! This is a quick card I created for a challenge at Crafting With Cristina where ahe asked us to create a project which used the colours white, black and grey ONLY.

The tree stamp is by Inkadinkadoo and the "You are in my thoughts" stamp is by Scrappy Moms.
Hope you like it!

#20 Wrap it Up - Card for a Princess


Hi everyone! Here is the card I created for the Momo's challenge at Made By Momo. The theme this week was "Princess".
I found this castle tag on the Wrap it Up cartridge and wanted to use it for a card. It was cut at 5" from pink cardstock, then I cut the tag blackout from the patterned paper. I used stickles to cover the outside border of the tag and added some detail with a Melon Mambo Stampin' Write marker.

I attached a piece of butterfly patterned paper (sized 4" X 5 1/4") to some pink cardstock (cut at 4 1/4" X 5 1/2") then added some stitching around the outside.

I attached the tag to the card, then stamped the circular Princess image on white cardstock, punch it out and attached it to the card front with Stampin' Dimensionals. As a finishing touch, I attached some flowers in the corner.

Hope you like it!

#19 Cindy Loo - Gift Card Holder


Hi everyone! Here is a gift card holder I created for the Wacky Wednesday challenge at More than Favors, which is over in 20 minutes. I finished in time though!

The cartridges I used for this card are:

Cindy Loo - gift card (cut at 8"), deer couple (cut at 2 3/4"), heart border (cut at 3/4")

George & Basic Shapes - pink hearts (cut at 3/4")


Patterned paper - K & Company

Cardstock - Stampin' Up, CTMH

"You're a Deer" stamp - My Pink Stamper

Ink - Stampin' Up (Rose Red), CTMH (Chocolate)


Hope you like it! Thanks for stopping by!

Sunday, January 23, 2011

You Are My Sunshine Imagine Card


Hi everyone! I was playing with my Imagine again tonight and came up with this card to enter in the Music Monday challenge at Handmade By Angelica and Erin Lee Creative. This week Angelica is the host and the song she chose was "Golden" by Jill Scott. And since the challenge is over tonight, yes I am very last minute :-) Be sure to head over there in the morning to find out what the next song choice is - it's a really fun challenge!

The cartridge I used for this card was the Kate's Kitchen Imagine cartridge. The main image originally says "Rise and Shine" but I was able to take that part out and just print the blue background blank. I then stamped "You Are My Sunshine" on it instead, which is from the Scrappy Moms "Amusing Animals" stamp set.

I added gold glitter around the edge of the sun using Martha Stewart's glittering glue. I then attached a golden ribbon along one side and some gold brads in the corners of the other side.

Hoe you like it!

Mr & Mrs Wedding Card


Hi everyone! Here a card I created today to cater to a bunch more challenges I found online. The image is from Pollycraft (one of my favorite sources for digis) and coloured with copics. All paper is all by Basic Grey from the Scarlett's Letter collection (yep - I've had that collection a while). The little tag stamp, punch and sentiment is from Stampin' Up!. The heart border punch is by Martha Stewart. The flowers are Prima.This card fits into the following challenges:

Basic Grey Challenges - use flowers, and at least one Basic Grey product. AND they are still looking for new Design Team members!

Dutch Dare - Follow this sketch:

Simon Says Stamp Challenges - BINGO - use three specific accents - I chose ribbon, a brad and flowers.

Stamp Something - something cute

Hope you like it!

Saturday, January 22, 2011

#18 Sweet Treats - OXO Cupcake


Hi everyone! Here is my latest Valentine's Card creation! I created this card for two challenges. At Fantabulous Cricut, the challenge this week was to create something with a "sweet" theme. At Peachy Keen Stamps Challenges, the task for the "Let's Face it Friday" challenge was to create something with X's and O's and feature some Peachy Keen face stamps.

Cricut Cartridges - Sweet Treats (cupcake cut at 4") Sweethearts (OXO cut at 1 1/4")

Stamps - Princess Face Assortment (Peachy Keen Stamps)

Cardstock - Stampin' Up! and Bazzill
Patterned Paper - K & Company
Ribbon - Celebrate It
Pens - Inkssentials and Stampin' Up!
Glitter - Elmer's
Funny, as I am typing this post my I Tunes is playing and "XXX's and OOO's" by Trisha Yearwood came on :-)
Hope you like it!

#17 Create a Critter - "Whale"come Home!


Hi everyone! I created this silly but cute card for the challenge this week at Tacky Tuesday, which is a Facebook group. Their choice of Cricut cut this month was the whale from Create a Critter. We also had to use the word "whale" in our sentiment.

Whale - Create a Critter cut at 3"

Face Stamp - Peachy Keen Stamps Extra Large Critter Faces

Embossing Folder - Cuttlebug D'Vine Swirls

Ribbon - Making Memories

Cardstock - Bazzill

Wave - Creative Memories Paper Trimmer

Patterned Paper - K & Company (yellow dot), CTMH (blue dot)

Ink -Stampin' Up! (Buckaroo Blue) and CTMH (Cocoa)

Pen - Stampin' Up! (Marina Mist)

Hope you like it!

Friday, January 21, 2011

You Are An Angel - Peachy Keen Card


Hi everyone! I created this card for the most recent challenge on the Peachy Keen Stamps challenge blog. The challenge was to create a project following this sketch:

I LOVE sketch challenges! I decided to use the beautiful "Our 2 Angels in Heaven" stamp set by Peachy Keen Stamps. I coloured the little girl angel with my copic markers. The stamped image was mounted on mulberry which I had torn in a circle shape. For anyone interested in using mulberry paper, a trick for getting the perfect torn edge is to make your line with a damp q-tip and it will rip perfectly along that line.

Hope you like my card!

Check out this Fantastic GIVEAWAY!

Hi everyone! I just wanted to let you all know about a fantastic giveaway that Lisa is having at her blog Honeybearz Designs. Would you like to win this?


How about this?

You have until Monday January 24th to enter and when you do, please tell Lisa that you were referred to her blog by Scrapaholic Jen (that's ME!) Good luck!
Have a great weekend everyone!

Thursday, January 20, 2011

Kiki and Kitty card


Hi everyone! I was in the mood for digital stamping and copic markers this evening so I created a card with this sweet image from Pollycraft.
Products used:
Digital Stamp - Pollycraft
Patterned Paper - Basic Grey (Two Scoops)
Velvet Ribbon
Copic Markers
Pearls - Kaiser
Border Punch - EK Success
I am entering this card in six challenges:

Basic Grey Challenges - Spots and Dots / use some Basic Grey product. They are also looking for new design team members!

Sketch N Stash - Follow this sketch:


Papertake Weekly - Ribbons and Pearls

My Time to Craft - Spots and Dots


Pollycraft Challenges - Pastel colours
Hope you like my card!

Wednesday, January 19, 2011

#16 B is for Boy - Trouble Layout!


Hi everyone! The latest weekly challenge at the Cricut Circle Blog was to create a layout using this sketch

We also need to use at least two Cricut cuts, stamping and buttons.

I chose to create a layout of my son taking some of his first steps! The cartridges and cuts I used are:

B is For Boy: Robot cut at 3 3/4"

Spaceboy cut at 3 3/4"

"Here Comes Trouble" and baby feet cut at 3 1/2"

Sugar & Spice: Scalloped Border cut at true size 11 3/4" width (this was adjusted on my Gypsy)

All patterned paper and cardstock - Close to My Heart.

Alien/Monster stamps - Autumn Leaves

Markers - Stampin' Up!

Buttons - unknown

Hope you like it!

Tuesday, January 18, 2011

#15 Preserves - Thanks a Melon!


Hi everyone! This cute melon card is my entry for the Let's Face it Friday challenge at the Peachy Keen Stamps challenge blog. The task was to create a Thank You card using some Peachy Keen face stamps. I decided to use the Preserves Cricut cartridge to create a watermelon shaped card on my Gypsy.

I used the Basic Paper Doll Face Assortment to put little faces on the watermelon seeds.

The "thanks a melon" sentiment is from Fruit and Veggie Puns stamp set by My Pink Stamper.

I then inked the lower edges and added a bow and some green buttons.

Hope you like it!

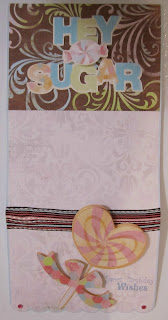
Hey Sugar Imagine Card


Hi everyone! This is a card that I have created for the Imagination Monday challenge at My Creative Time. The task was to create a project with a sweet/Valentine theme using our Cricut Imagine machine. I used the Yummy cartridge to create this tri-fold card, which is actually one of the cuts on this cartridge. The card was printed and cut at 10 1/2".

The lollipop on the front was cut at 4", then I cut just the layer part of the heart and the ribbon and adhered them with Stampin' Dimensionals to add some pop.

"Hey Sugar" was cut at 2 1/2", and I also cut an extra candy piece to pop up too.

The "Sweet Birthday Wishes" stamp on the front is from the Sweet Somethings stamp set by Scrappy Moms. It was stamped in Stampin' Up!'s Brocade Blue.

I also folded some ribbon along the top edge because when the Imagine printed the card,it printed score lines and I wanted to cover them up. As a final touch, I added some pink bling in the lower corners.

Hope you like it!

Monday, January 17, 2011

#14 Mini Monsters - Imagine Layout


Hi everyone! Here is my first Imagine layout! This was so fun to create and pretty simple, but since it was my first, it took me forever! I am happy to be learning how to work my new machine though! I used the Mini Monsters Cricut cartridge combined with the JT Imagine cartridge to create the design.
I created this layout for two challenges this week:
Flaunt it Fridays - create a non-Halloween themed project using the Skull and Crossbones cut from Mini Monsters.
Cricut Cartridge Chaos Challenge - use the Mini Monsters cartridge on a project.
The images from the Mini Monsters cartridge are:
Skull and Cross bones (including background) - cut at 5"
Danger Title - cut at 3"
All patterned paper is printed from JT Imagine cartridge.
Flame border cut at 4"
Photo matcut at 5"
Hope you like it!

#13 Once Upon A Princess - Gift Bag


Hi everyone! Here is a gift bag I created for the latest Wednesday Challenge at More than Favors. I love challenges like this because I think the Cricut gift bags are so fun to put together! The cartridge I used for this project is Once Upon a Princess. The bag was cut at 10" (using a 12" X 24" cutting mat). The little girl and her outfit were cut at 5". The "Sweetheart" word was cut at 1.85" (used the Gypsy for the sizing).

The bag was cut from white cardstock then I randomly stamped it with 2 images from the CTMH stamp set "Color My World".

I used the Swiss Dots Cuttlebug folder to give a little extra detail to her pants, the hearts on her clothes and the heart on the word.

All stitching was drawn with Stampin' Write markers by Stampin' Up!.
The face stamp is from the Princess Face Assortment by Peachy Keen Stamps.

Hope you like it!

#12 Graphically Speaking - Reading Layout


Hi everyone! Tonight I finished up a layout for a new challenge at Two Scraptastic Gals. Each week Meriah and her friend Paula from More Than Favors will be choosing a cartridge to spotlight and we will have to create something using that cartridge! Their choice last week was Graphically Speaking. This is a cartridge that I purchased pretty soon after it came out - I HAD to have it! Well, I think I have used it once. Hmmmmm. AND I really had a hard time figuring out what I was going to do for this challenge!

I came up with this layout to put pictures on of my 7 year old daughter Jenae reading to her little brother who is 3.

The children reading was cut at 3 3/4"

The book was cut at 2 1/4"

The "Tell me a Story" title was cut at 4"

"Read" was cut at 2 1/4"

The patterned paper is from the Nana's Nursery Boy Stack by DCWV.

Hope you like it!

Sunday, January 16, 2011

You & Me Valentine's Day Card


Hi everyone! This is a card I created for my hubby. The Cricut cartridges I used are:

Sweethearts - Scalloped Heart (cut at 4 1/2") "You & Me" (cut at 2 1/2") Scalloped Heart Blackout (4 1/2")

Lacy Labels - Scalloped Squares (cut at 5 1/2") welded together on Gypsy to form a card.

I ran the scalloped heart through the xyron and added red glitter.

The heart corner punch used on the patterned paper is by Fiskars.


I created my card for two challenges:

Music Mondays - Erin and Angelica have started some new challenges based on music! Fun! This week their song choice was "You are the Best Thing" by Ray LaMontagne. I decided to create a card for my husband for Valentine's Day, but I might just give it to him before since we are still a month away and I am likely to be creating more cards before then. He's the best thing in my life! I am the luckiest girl in the world! He spoils me rotten and for our children he is best father I could ask for! OK enough of the mushy stuff....LOL

Cricut Cardz Challenge - Use the colours black, red and white.

Hope you like it!

#11 Sesame Street Seasons - Winter layout


Hi everyone! Here is a layout that I created for some sledding pictures of my kids that I have not developed yet! This was my first time using the Sesame Street Seasons cartridge - there are some really great images on there if you or your kids are Sesame Street fans! I created this layout for the challenge at Fantabulous Cricut this week which was to create a project featuring winter clothing. Elmo and Big Bird are decked out in their hats and mittens for some snow fun!
The cartridges I used are:
Sesame Street Seasons - Elmo. Big Bird, snowflakes, "winter" and scalloped frame.
Winter Frolic - "Snow Much Fun"
Hope you like it!

Saturday, January 15, 2011

My Scrap Space


Hi everyone! Tonight I thought I would show you some pictures of my scrapbooking area. Earlier this month, I mentioned that I had been busy organizing it and thought I would snatch some pictures while it was tidy - this is soooooo much tidier than it has EVER been! I am such a messy scrapper!
There are still a few things I need to organize better. For instance, on the wall you don't see is my daughter's little desk with her little Create machine - it's pretty cluttered, so maybe I will post an updated photo in a few days. Also, my little guy thought it was fun to go around and take the labels from my jetmax drawers and rip them in half, so I have to redo them and maybe laminate them?
Well, that's all, it's a pretty small, yet packed space - not sure how much more I can cram into it :-) but somehow there is always room for more isn't there? Now that it's clean, I can get back to creating!
Have a great weekend!

Thursday, January 13, 2011

#10 Winter Lace - Feeling Frosty!


Hi everyone! This is the card I made for the weekly Cricut Circle challenge over on their blog. The challenge this week was to create a project with a winter theme using a snowflake cut, white paint and metal. We also had to use at least 2 Cricut cuts.

I used my Imagine to create with the Frosty Pattern cartridge.

The Cricut cartridges I used are:

Winter Lace - Snowflake: cut two at 2.9"
One shadow at 2.9"

Paper Lace - Scalloped square - cut at 3"

Square background - cut at 4.7 "


The card is 5" X 5", and I rounded the corners with a corner rounder.

I tied some linen thread (Stampin' Up) to a metal button and attached it to the center of the snowflake.

I ran the lower edge through the Cuttlebug using the Snowflakes embossing folder. I used a white paint dauber (Ranger) to paint the embossed backgound. Then I wiped over it with a paper towel.

Velvet ribbon was adhered along the upper edge of the embossing.

Pewter eyelets (Making Memories) were attached to each corner of the background piece.
For a final touch, "for you" (Stampin' Up) was stamped in the upper corner, then I inked around the edge of the card with the same ink (Bermuda Bay, SU!).
Hope you like it!