Search This Blog

Thursday, March 31, 2011

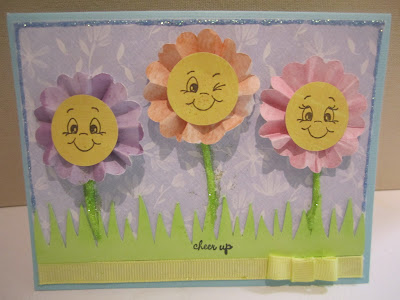
Cheer Up Peachy Keen Card

Hi everyone! Here is a card I created for the Let's Face it Friday challenge at the Peachy Keen Stamps challenge blog. The challenge was to create a project using a handmade flower and Peachy Keen face stamps.
I created my flowers by cutting a 2" scalloped circle with the Mini Monograms cartridge (you can find a scalloped circle on numerous other cartridges as well). I then spritzed it with water so it would be easier to manipulate. Creating a center point, I accordian folded around the circle then used quick drying adhesive to glue the center point to a small circle of scrap paper.

I punched a 1" yellow circle then used the Peachy Keen Stamps Everyday faces set for the faces.

I used a quick drying white glue and green glitter for the stems.

The grass was cut from Plantin' Schoolbook and sized on my Gypsy to be 5.25" in length.

I added light blue stickles around the edges, yellow grosgrain ribbon along the bottom and a "cheerup" sentiment as a final touch.

Hope you like it!

Kate's Kitchen Card - You're My Cup of Tea!

Hi everyone! Hope you have all been enjoying your Thursday! The weekend is almost here!
I created this card for the weekly challenge at the Cricut Circle Blog where our task was to create a "Just Because" card or layout. I chose to make a card with my Imagine using the Kate's Kitchen cartridge.

For my project today I used the textured Whisper White cardstock by Stampin' Up!. I found it worked really nicely in the Imagine.

The card base is 5.5"X5.5" so I used the square stock image included in the Imagine to cut the background pattern and a pattern to create the border along the bottom.

The tea pot and cup image was cut using the layers function at 3".

"You're My Cup of Tea" was cut at 1" then I cut an extra layer of "You're My".

I used Stampin' Dimensionals to pop-up the tea cup, the drop of tea and "You're My".

The metal pieces are by Imaginisce and heat bonded with the I-Rock.

As a final touch I added an ivory satin bow.

What a super fun card to make! Hope you like it!

Wednesday, March 30, 2011

Blast Off Flash Cards

Hi everyone! For the last couple nights I have been busy with my Imagine machine creating some flash cards for my daughter who is in the second grade. She needs help with memorizing her math facts so I figured this was a perfect little gift for her and she's so excited to practice with them!
For this project the Imagine cartridge I used was Blast Off, a cool child-themed font with bright cheerful colours!

Boxes:

I used the crayon box cut from Tags, Bags, Boxes and More sized at 6.3" and cut and print with the Imagine.

The scalloped oval was cut from B is For Boy at 5".

The oval was also cut from B is For Boy at 4.5".

I then stamped "Addition" and "Subraction" on the ovals.
All other images were cut and printed from Blast Off and sized to fit in a 3" X 4" area.


Flash Cards:
I printed out four 12X12 sheets of patterned paper from the Blast Off cartridge and cut each into twelve 3"X4" rectangles.

The numbers were cut at 1.2" from Blast Off.

The "plus" and "minus" symbols were cut from Don Juan and filled in with Blast Off.

After writing the answers on the back of each card, to make them more durable, I ran them through my Your Story machine to laminate them.

I created these flash cards for the Monthly challenge at the Cricut Circle Blog. This month they asked us to create something for child that was not a card or layout. The prize this month is a gently-used Cricut Expression for the school of our choice along with 4 cartridges. I was already fortunate enough to have the Cricut Circle donate one to my daughter's school at the beginning of the school year but would be super excited to pass one on to another school in the area! Crossing my fingers!


Hope you like my flash cards and that you're having a fantastic week so far!

Monday, March 28, 2011

Hoppy Easter! Tacky Tuesday Challenge


Hi everyone! Here is a card that I created last week for the latest Tacky Tuesday challenge on Facebook. I forgot to enter it in the challenge then, but thankfully the challenge goes until tomorrow! See, even when I create something ahead of time I don't manage to enter it until last minute LOL. The challenge was to create a project using the bunny cut from the Birthday Bash Cricut cartridge. Isn't he a cutie?

My bunny was cut at 3 1/4".

The face stamp is from the Peachy Keen Critter Faces Medium set

Flowers from Boho Blossoms punch, markers and ribbon by Stampin' Up!.

Hope you like it!

Wednesday, March 23, 2011

#56 Doodlecharms - Sweet Birthday Wishes

Hi everyone! Here is a sweet birthday card I created tonight! I have been trying to get ready to go to a weekend crop this weekend hosted by my Mom but I just can't quit creating long enough to prepare! That means, as usual, I will be totally unorganized and stuffing things into my totes right before it's time to leave. :-) So excited though, love scrapbooking with my mom and sisters as well as the wonderful ladies in the community where I grew up!
Anyway, when making this card I had three challenges in mind:
Crafting with Cristina - Colour challenge - Hot Pink, Orange and White
Fantabulous Cricut - Birthday theme
Cricut Cartridge Chaos - Doodlecharms cartridge

Products used:
Cupcake cut at 3 1/4" from Doodlecharms
Cardstock - Stampin' Up, American Crafts
Patterned Paper - American Crafts
Embossing Folder - Cuttlebug (D'Vine Swirls)
Markers - Stampin' Up
Ink - Stampin' Up
Stamp - Scrappy Moms

Hope you like it!

Tuesday, March 22, 2011

#55 All Mixed Up - Yummy Baby Layout


Hi everyone! Here is a layout I created using the Cricut Imagine with the Nursery Tails cartridge (my favorite!). The weekly challenge at the Cricut Circle Blog was to create a project using our Imagine machines. I have a huge pile of photos to scrapbook so figured I would use this opportunity to create something with them.
The cartridges/cuts I used are:
Nursery Tails - Bib cut at 5"
Food Jars - 2"
Border - cut 4 at 0.7"
Frogs - 3.5"
Spoon and Fork - 4"
Photo Mats were printed using George and Basic Shapes, cut 5" square then trimmed to mat size.
All Mixed Up - Title and Question Mark cut at 2"
Hope you like it!

Sunday, March 20, 2011

#54 Life's A Beach - Lighthouses Layout


Hi everyone! This is a layout I whipped up this afternoon. In June 2006 my family went to Newfoundland where my sister was getting married. It was our first time travelling out there so we had to do a little sight-seeing as well. What a beautiful place! One of the popular tourist attractions of Newfoundland are the lighthouses along the coast - this layout shows some of the ones we visited.

The Cricut Cartridge Chaos challenge this week was to use the Life's a Beach cartridge.

I cut the lighthouse at 11", the letters at 1 1/4" and the ship wheels at 1 1/2".

Hope you like it!

Saturday, March 19, 2011

You're a Star!


Hi everyone! Here is a card I created for a few challenges going on this week. I got this cool digi a few weeks ago from Pollycraft and finally got to use it! Love how the Copic colours I chose look with the patterned paper. The glittered patterned paper is by DCWV from the All Dressed Up paper stack and I have had it for a few years now. Awesome paper!
The challenges this card fits are:

Sketch N Stash - Use something from your stash (I used older paper stash) and this sketch:
Papertake Weekly - 3 of something ( I used three patterned papers and three glittered brads.).
Other supplies:
Brads - Making Memories
Stars and sentiment stamps - CTMH
Silver Embossing Powder
Copics

Wednesday, March 16, 2011

Happy St. Patrick's Day!

Hi everyone! Here is a card I created for some challenges going on this week! For my second St. Patrick's Day card this year I chose to use the shamrock from Paper Doll Dress Up cut at 3 3/4" and made a border with the shamrocks from Celebrate With Flourish cut at 3/4".
The challenges I am entering are:
Cricut Circle Weekly Challenge - use a rainbow or monochromatic green colour scheme as well as a little bit of gold. Also use at least 2 Cricut cuts.
Fantabulous Cricut - make a square card using the colours green and gold.
More than Favors (Wacky Wednesday) - St. Patrick's Day theme.
I used some gold cording I picked up at Michaels to tie around the shamrock and attached gold brads to one of the paper strips.
"St. Patrick's Day" is printed with my Xyron Design Runner.
The gold pen used to detail the large shamrock is by American Crafts.
All paper is from my scraps stash.
Hope you like it!

Tuesday, March 15, 2011

Because I Care


Hi everyone! Here is a card I created for the Wacky Wednesday Challenge at More than Favors. This week Paula was having a colour challenge and the chosen colours were purple, green and yellow.
I decided to make a card with my Stampin' Up! supplies.

Stamp Set - Because I Care (Hostess set)
Cardstock - Rich Razzleberry, Old Olive, Very Vanilla
Patterns Designer Series Paper - Daffodil Delight
1/4" Grosgrain ribbon - Daffodil Delight
Stampin' Write Markers - Rich Razzleberry, Perfect Plum, Elegant Eggplant, Old Olive, Garden Green, Daffodil Delight
Classic Stampin' Pads - Basic Black, Elegant Eggplant
Scallop Trim Border Punch

Hope you like it!

Sew Wonderful


Hi everyone! The latest Let's Face it Friday Challenge at the Peachy Keen Stamps Challenge blog is to create a project featuring stitching. I made this card for that challenge, using my sewing machine for the stitches.

The quilt block and thread cut is from Country Life, cut at 3 1/4".

I tore a strip of cotton fabric to make the ribbon.

The face stamp is from Peachy Keen's "Happy Lashes" face assortment.

Hope you like it!

Monday, March 14, 2011

Your Friendship...Card


Hi everyone! Here is another card I created using a stamped image that I coloured in with Copic Markers.

Stamped Image - Sarah Kay / Stampavie
Stamped Sentiment - Stampin' Up!
Bling - Kaiser Craft
Ribbon - American Crafts
Flowers - Prima
Patterned Paper - Hot of the Press
Cardstock - Bazzill Basics

The challenges I am entering this card in are:
Moxie Fab World - Stamping with markers challenge
Fab 'N' Funky - Make it Girly
Simon Says Stamp - Anything Goes
Hope you like it!

#53 Stretch Your Imagination - Thank You Tree


Hi everyone! Hope you had a great weekend! Here is a card I created for two challenges:

Fantabulous Cricut - Tree Time

Cricut Cartridge Chaos - Stretch Your Imagination Cricut cartridge


The tree was cut from the Stretch Your Imagination at 4 1/4".

The fancy rectangle was cut from Storybook at 4 1/4"


Hope you like it!

Friday, March 11, 2011

#52 Cricut Everyday - Cricut Circle Placecard


Hi everyone! I received the latest Cricut Circle exclusive cartridge a couple weeks ago and this is my first project with it! The Cricut Circle magazine challenge this month was to use Cricut Everyday to "create something that you would use to define yourself at Meet-Ups, Crops, the Stampede or any other circle event! Your project can be your calling card, tags, table decor or something to swap."

It took me a while to decide what to make but finally I decided on a place card to put at my cropping spot. I'm not sure if and when they will be having a Circle meet-up here in Canada but I love how it turned out so I might just have to use it at the crop I am going to in a couple weeks! I tried to customize the placecard to represent myself by adding the colour purple ( my very favorite!) and my three favorite things - Cricut, lace and bling!

The cuts I used are:
Placecard/Circle logo - cut at 11 1/4"
Cricut logo - cut at 3 1/4"
"Scrapaholic" - phrase feature with shadow cut at 3/4"
"Jen" - font 2 with shadow cut at 1 1/4" (shadow is welded with Gypsy)
Cardstock - DCWV
Bling - Kaiser
Lace - Doodlebug Designs
Marker - Stampin' Up!
Hope you like it!

Wednesday, March 9, 2011

#51 Wildlife - Deer Hunt


Hi everyone! The weekly challenge at the Cricut Circle blog this week was a "Guy Stuff Challenge".
The Challenge: Incorporate at least three of the following types of materials on your project. (Hardware items, stars, raw cardboard or chipboard, twine, string, paint, buttons, staples, or distressed edges)

I rarely do masculine layouts. They always seem to be the last in line when I am chosing which projects to do, so this was a really good challenge for me! I chose to do a layout of my hubby's deer hunting.

The cartridges/cuts I used are:
Wildlife - Deer cut at 3 3/4" and title cut at 4"
Give A Hoot - leaf charm cut at 2"

For the challenge items I used staples to attach the twine, raw cardboard for the top layer of the charm, buttons as accents, and used ink to distress the edges of the deer cut.

Cardstock - CTMH
Patterned Paper - Creative Memories
Linen Thread/Marker - Stampin' Up!
Buttons/Twine - Unknown


Hope you like it!

Tuesday, March 8, 2011

Tons of Fun!


Hi everyone! Here is a card I created for the Wacky Wednesday Challenge at More than Favors. The theme was ZOO and I haven't used my Create a Critter cartridge for awhile so this was the perfect opportunity!

The elephant was cut at 2 3/4". I ran the pink ear layer through my Xyron and added flocking - love the cute fuzziness!
The scalloped oval is from Lacy Labels and was cut at 4" X 5 1/4" (sized on my Gypsy)

Ribbon - American Crafts
Embossing Folder - Sizzix
Stamp - My Pink Stamper
Stampin' Dimensionals, Markers - Stampin Up!

Hope you like it!

Sunday, March 6, 2011

Tilda and the Frog Prince


Hi everyone! Here is a card I created last night to enter in a couple of challenges! I am pretty occupied with my Cricut most of the time but really enjoy colouring with my copics too! And Tilda is just so cute!

The challenges I am entering my card in are:
Sketch and Stash - following this sketch and use your stash - all of the papers I used were from my scraps.

Just Magnolia - Anything goes with option of glitter - I used Spica gold glitter pen on her wings.

Papertake Weekly - Anything goes

Flutterby Wednesdays - Anything goes with butterfly, fairy or angel.

Stamp - Fiskars

Flowers - Prima, Recollections

Fiber, Ink - CTMH

Hope you like it!

#50 Mickey and Friends - Minnie Shaped Card!


Hi everyone! Here is a sweet Minnie Mouse card I created for the challenge this week at Fantabulous Cricut. The challenge this week was to create a shaped card (something other than a square or rectangle).

I chose to use this Minnie Mouse as well as the name cut from the Mickey and Friends cartridge. Isn't she pretty?
I welded two 5 1/2" blackout Minnies together with my Gypsy to make the card base.
I then cut all of the Minnie Mouse pieces at 5 1/2" and attached to the card base.
"Minnie" was cut using the Gypsy and sized so it would cut at 4 1/4" - since
5 1/2" X 4 1/4" is the standard card size.
All of the cardstock used was from my scraps.
Hope you like it!

Saturday, March 5, 2011

Walk in the Rain Card


Hi everyone! Here is a card I created tonight featuring a Pollycraft digital stamp. Cute image, right? I coloured the image in with my Stampin' Up markers. Normally I would use my copics, but I had left them upstairs and didn't want to wake my little guy. They still do a great job though!

All of the papers used are from my scraps stash.

I am entering my card in the following challenges:

Stamp Something - Use something digital

Pollycraft Challenges - Three circles

Cute Card Thursday - Signs of Spring


Incy Wincy Designs - Spring is in the Air

Delightful Challenges - Welcoming Spring


Lots of spring challenges this week! Where I am, it definitely does not look like spring but it would sure be a welcome change! I am tired of the snow, and it just keeps on coming!

Anyway, hope you like my card and please stop by again soon! Have a great weekend!

Friday, March 4, 2011

#49 Designer's Calendar - Feeling Lucky?


Hi everyone! Here is my first EVER St. Patrick's Day card! St. Patty's Day has never been a big deal for me for the following reasons:
- never really liked the whole pinching thing when I was little (or now either LOL) if I didn't wear green.
- I don't look good in green.
- Leprechauns are creepy.
- I know there's no pot of gold at the end of the rainbow (just ask my little sister, she actually ran a long way to find it haha)
- Hate beer so when I got to college couldn't look forward to green beer either.
However, I do like the Irish being that I am married to one. I guess that makes my kids Irish as well, so maybe we should be celebrating after all!

Anyway, I created this card using the Designer's Calendar cartridge. I cut the image out twice, separated the clover and hat trim from one of the pieces and added glitter with my Xyron.
For the background, I used a rainbow stamp pad and a brayer over glossy cardstock.
I created this card with two challenges in mind:
My Creative Time - St. Patrick's Day theme using an older Cricut cartridge.

Crafting With Cristina - St. Patrick's Day theme using the colour green.

Hope you like it!

#48 Hoot N Holler - Hoot-errific!


Hi everyone! Here is a card I created for a challenge Robyn was having this week at My Pink Stamper! She asked us to create any project featuring a feathered friend! I chose to use the Hoot N Holler cartridge for my project - there are a ton of great choices on that cartridge to go with this theme!

My owl was cut at 2 3/4". I made a bow from 1/8" black satin ribbon for her heard.

The scalloped square is from Mini Monograms, sized to 3 3/4" X 3 3/4" real dial size on my Gypsy.

All papers were taken from my scraps stash.

"Hoot-errific" is from Tweetie-Hoo Puns by My Pink Stamper.
Hope you like it!

Thursday, March 3, 2011

#47 Tags, Bags, Boxes and More - Matchbox


Hi everyone! Tonight I decided to whip up a last minute entry to the challenge at Flaunt it Fridays. The challenge this week was to use the Match 2 Box from the Tags, Bags, Boxes and More cartridge.
Cardstock - Stampin' Up!
Patterned Paper - CTMH
Flowers - Prima
Hope you like it!

Wednesday, March 2, 2011

#46 Happily Ever After - Snow White


Hi everyone! This is the layout I created for the weekly challenge at the Cricut Circle Blog. The theme this week was Fairy Tale or Folklore.
My daughter Jenae has always loved dressing in costumes. I made her two princess costumes for Christmas a couple years ago - one Snow White and one Cinderella. She LOVES them still even though they no longer zip up in the back :-)
For this layout I used the Happily Ever After Disney Princess cartridge as well as the new Mother's Day Bouquet seasonal cartridge for the flowers.
Snow White is cut at 5 1/2"
The title "Snow White" is cut at 4"
The flowers are cut at 3/4"

Hope you like it!

Sending Thoughts Card


Hi everyone! Here is a gate-fold card that I created for a couple of challenges.

For Emma's Throwback Thursday challenge at My Creative Time, she asked us to use the Walk in My Garden cartridge as well as feature flowers somewhere on our project.

I also wanted to incorporate the sketch from the Peachy Keen Stamps challenge, which looks like this:
Hope you like it!

Tuesday, March 1, 2011

Birthday Sundaes - A New Challenge Blog!


Hi everyone! I came across a new challenge blog called Birthday Sundaes that will be starting up on March 2oth:
"A little about the new challenge blog:Birthday Sundaes is a weekly challenge blog beginning March 20, 2011. The goal of Birthday Sundaes is to build up those birthday card stashes! I just love to make birthday cards and hope you do too! Types of challenges Birthday Sundaes will be hosting are color, supply, recipe, inspiration & technique challenges incorporated into birthday themed cards."
Sounds like fun! They are also taking applications for their Design Team if you are interested in that! Click here to go check out this fun new challenge blog!

Original Scrapbox Giveaway for Canadians!


Hi everyone! I was over at Nicole's website - Canadian Nickel Scrap'n where she has announced a super exciting contest for Canadian Scrapbookers!
"Calling all "Canadian" fans!!!!!
In celebration of our creative Canadian fans, The Original Scrapbox is hosting 9 preliminary giveaways with a chance to win an entry into the Grand Prize Drawing for one Raised Panel Vanilla Workbox! "

Sooooo, my Canadian friends, please hurry over to Canadian Nickel Scrap'n to get all the details and enter to win this AMAZING prize!
Good luck!